Let's Start: Create Your First Bulletin
This walkthrough shows the complete process for creating a Bulletin from the home page through export or publication. To keep the example focused, it completes only the first two content sections: Forecast and Hazards. The remaining sections follow the same pattern defined by the selected Template.
Before you begin
The fields and sections shown in this guide come from the selected Template. Another Template may contain different section names, field labels, limits, or validation rules.
Who can publish directly?
Direct publication with Publish is available only to users with the supereditor role. If you do not have that role, use Send to review instead. A reviewer can then approve and publish the Bulletin from the Reviews module.
1. Open the Bulletins module
Start from the application home page.
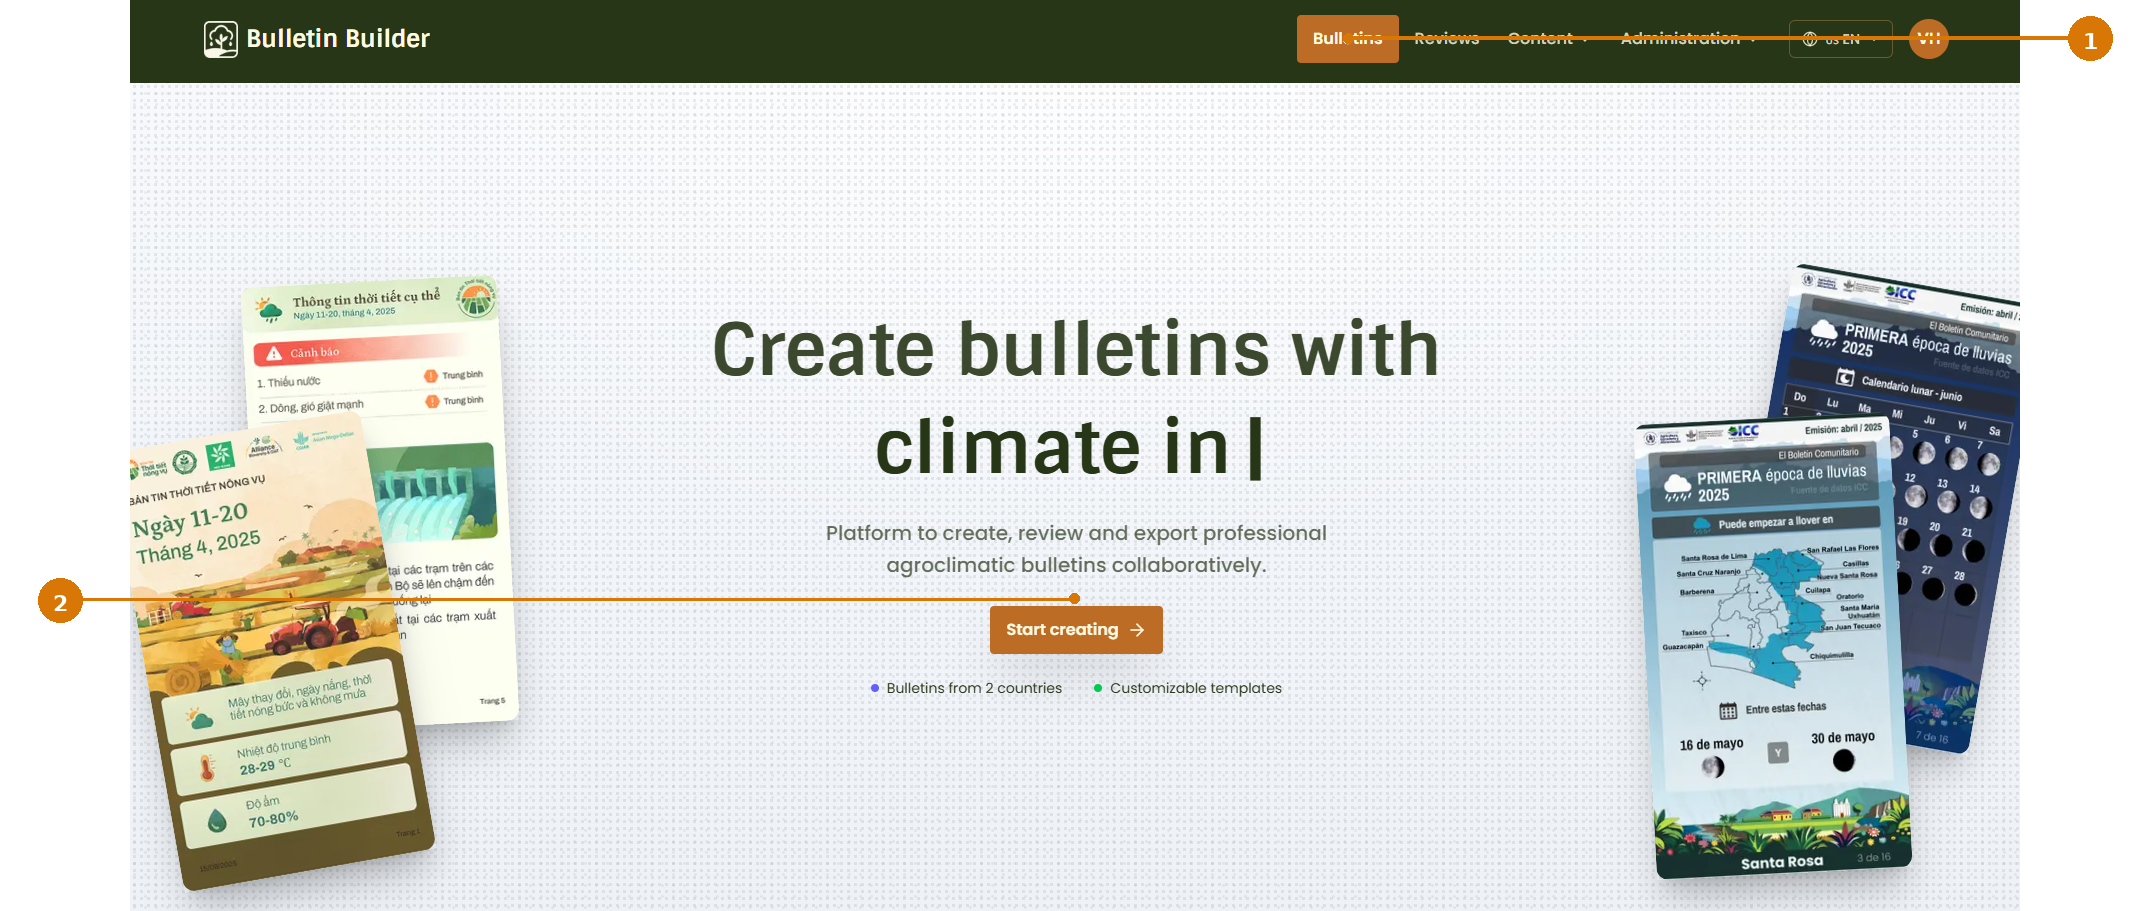
- Bulletins — Opens the Bulletin management module from the main navigation bar.
- Start creating — Provides a shortcut into the Bulletin creation experience.
For this walkthrough, open Bulletins from the navigation bar.
2. Start a new Bulletin
The Bulletins page shows existing Bulletins and their workflow status.
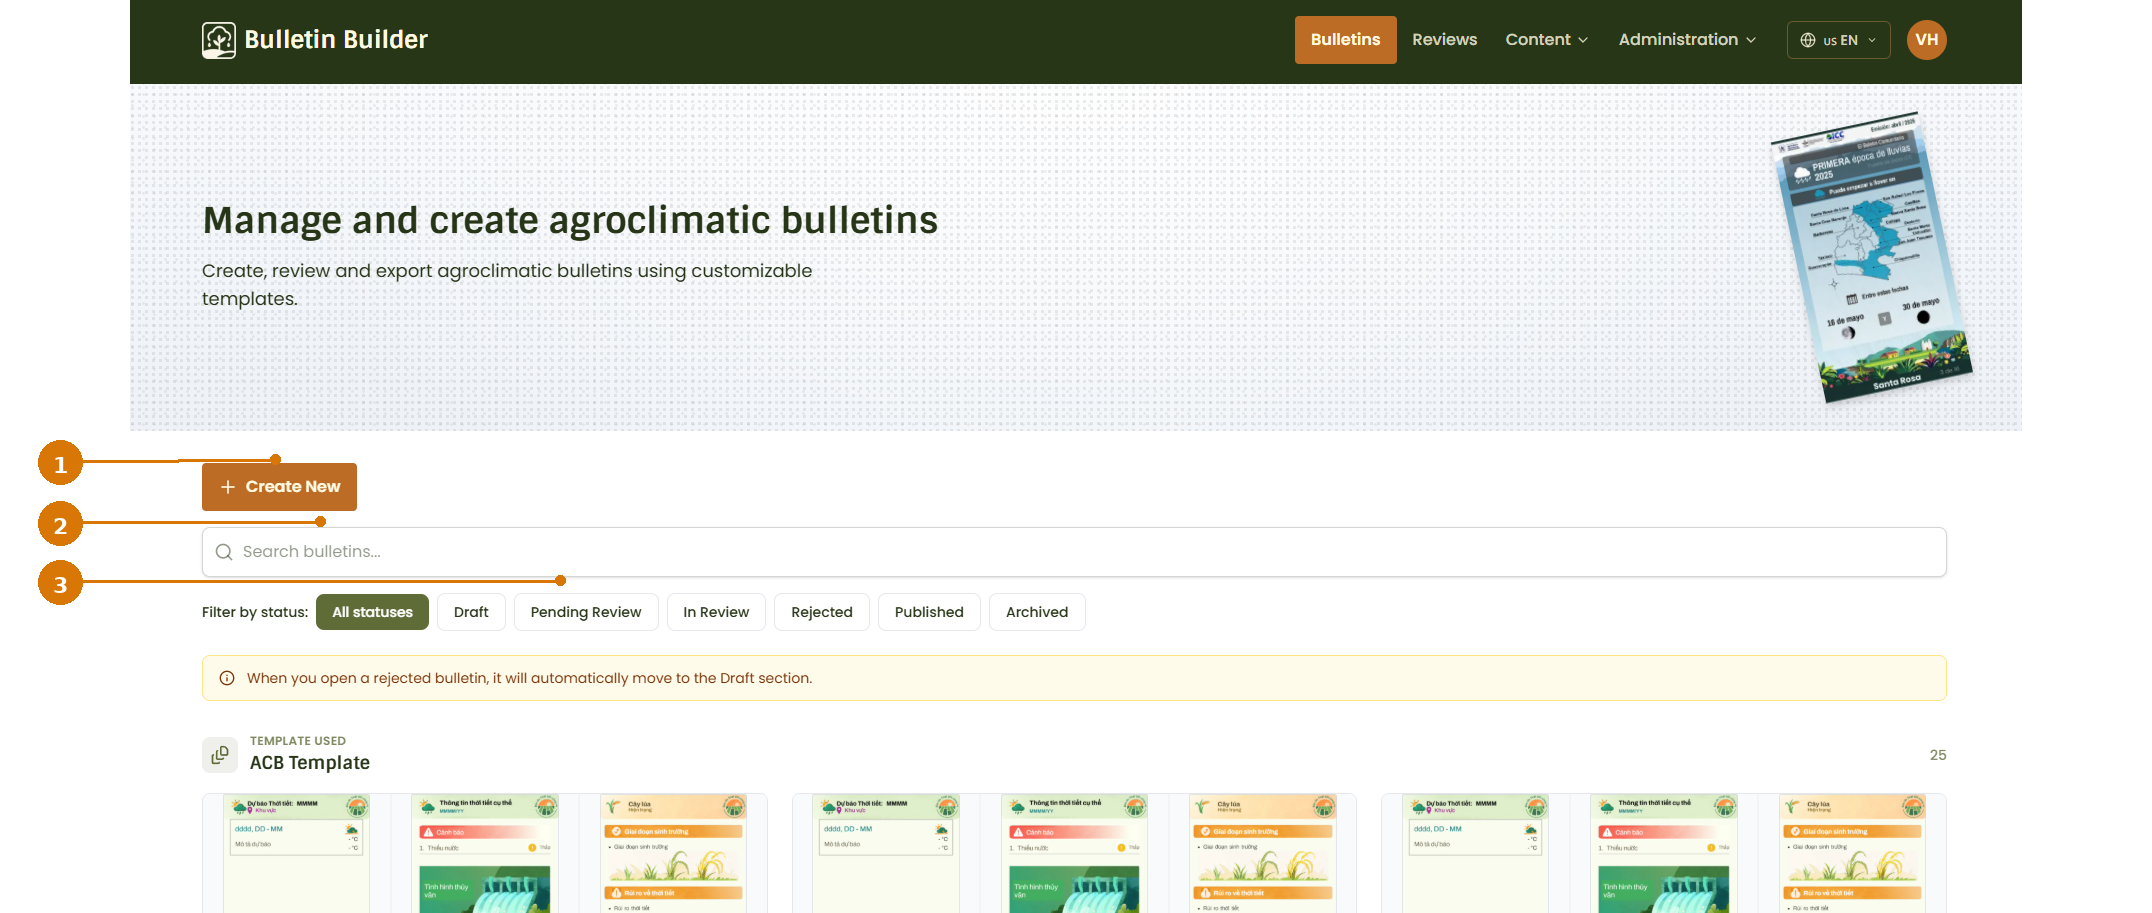
- Create New — Starts the Bulletin creation wizard.
- Search bulletins — Finds existing Bulletins by name.
- Status filters — Filters existing Bulletins by workflow status, such as Draft, Pending Review, In Review, Rejected, Published, or Archived.
Click Create New.
3. Select a Template
Every Bulletin is created from a Template. The Template determines the Bulletin structure, dimensions, styling, sections, blocks, fields, and validation rules.
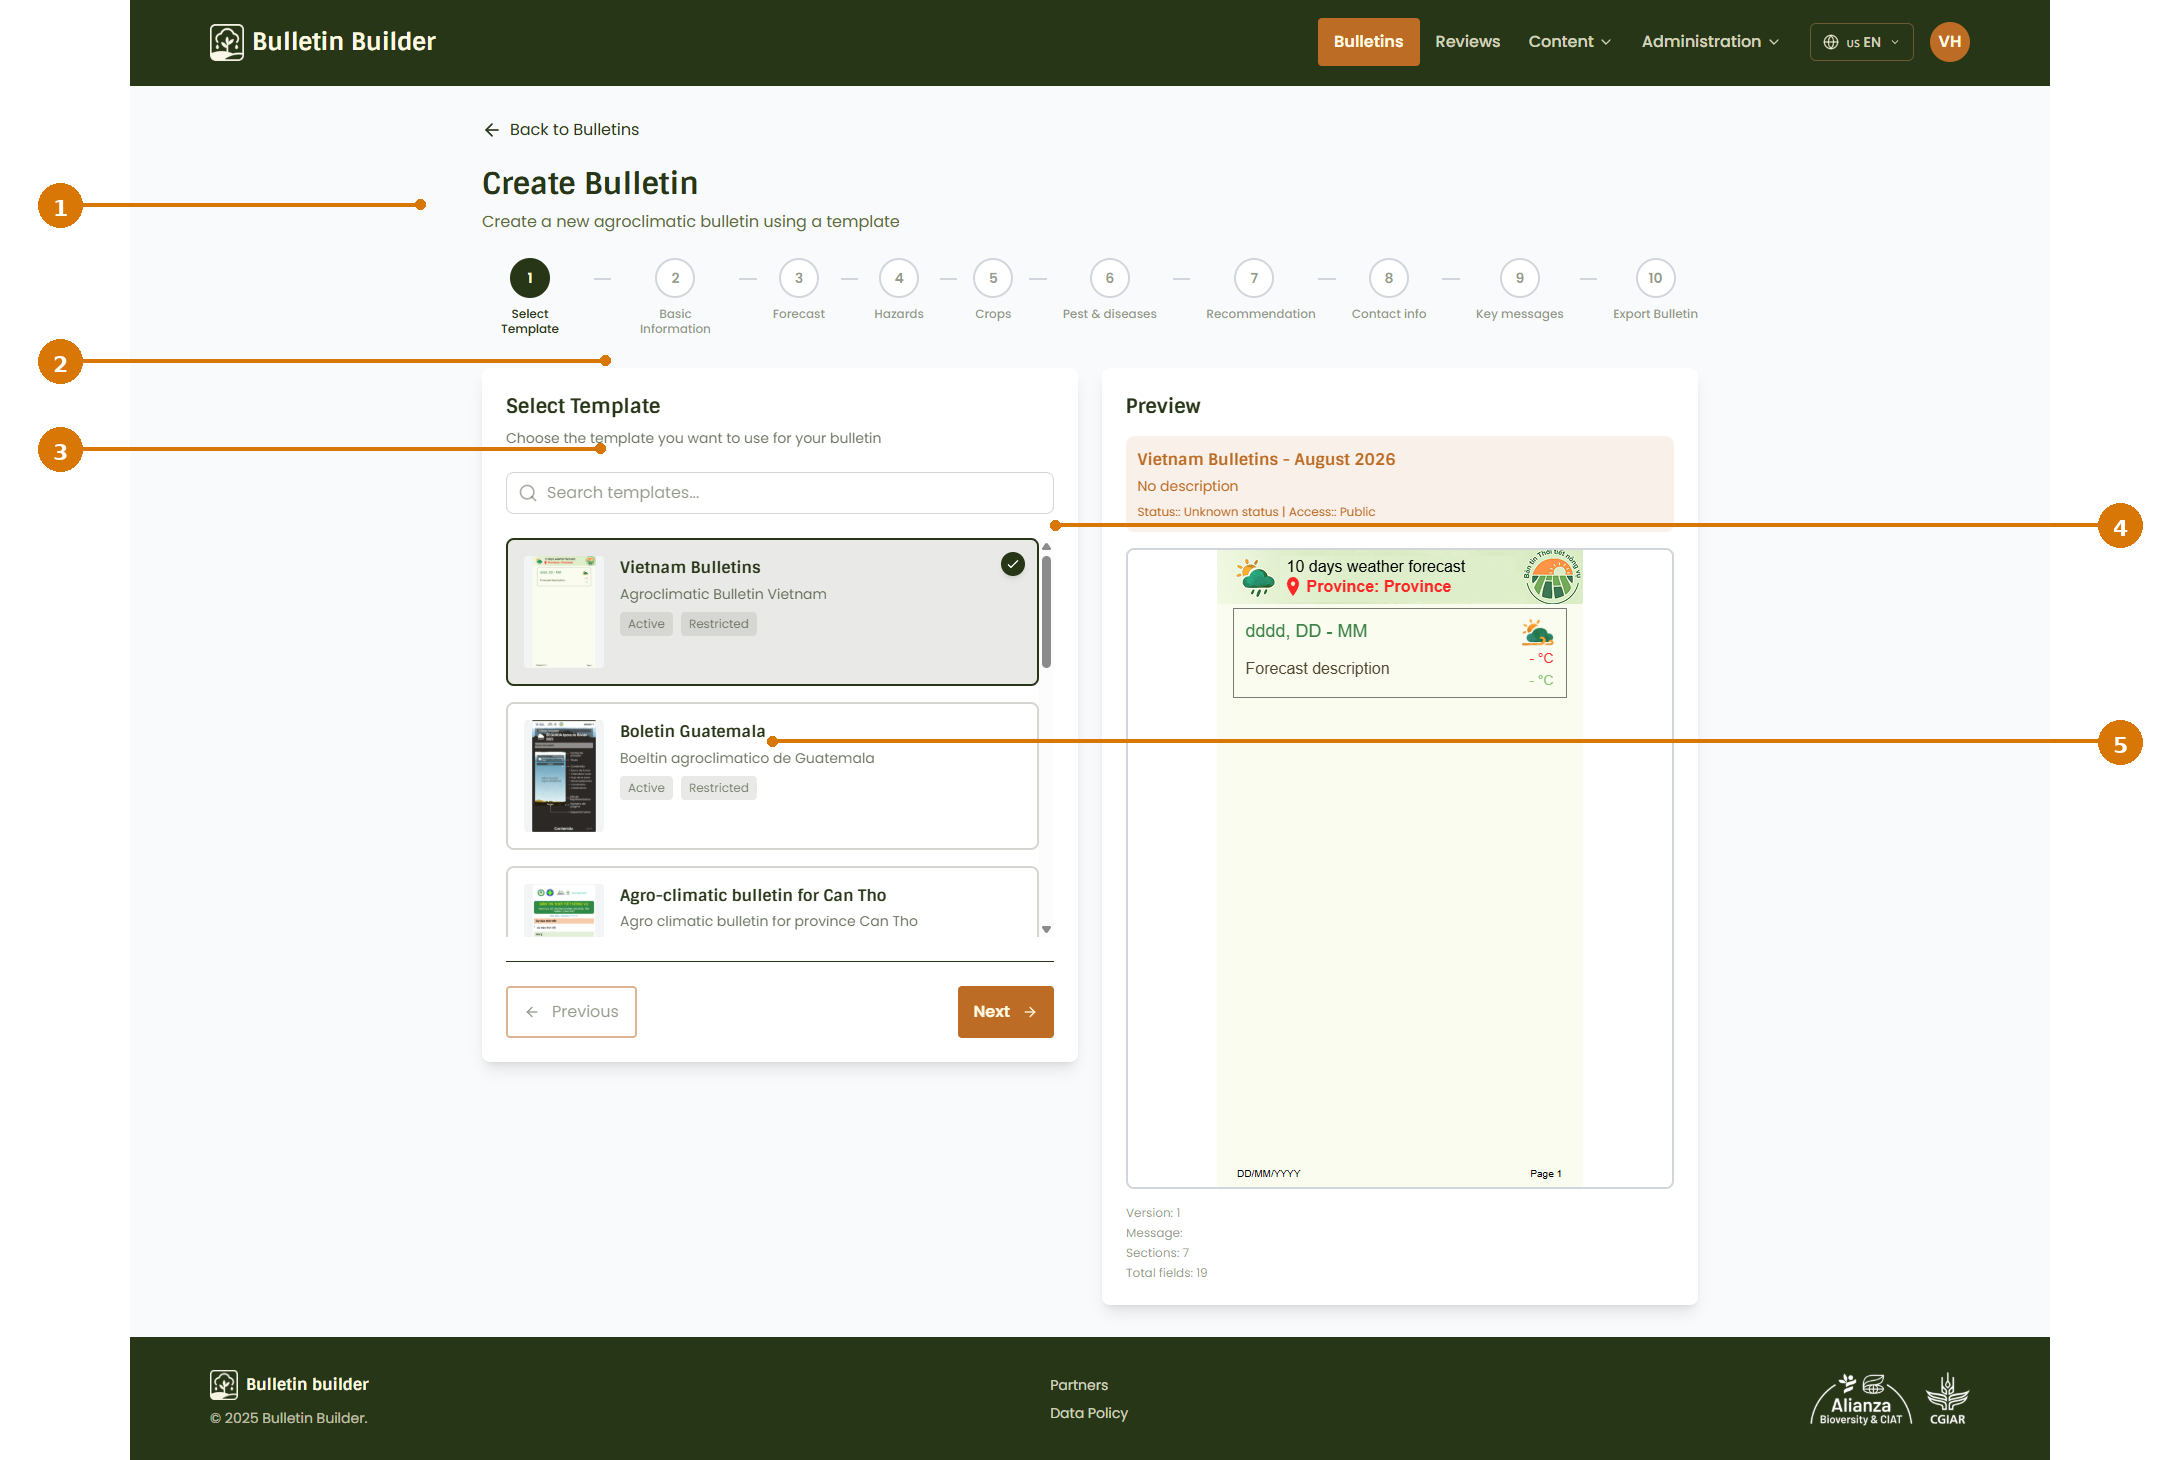
- Step indicator — Shows that you are currently on Select Template.
- Search templates — Filters the available Templates.
- Selected Template — Click a Template card to select it. The selected Template is highlighted and displays a confirmation indicator.
- Preview — Shows the first rendered page of the selected Template before the Bulletin is created.
- Next — Continues to Basic Information.
In this example, Vietnam Bulletins is selected. The Template is marked Active and Restricted. A restricted Template is available only when your access configuration allows you to use it.
The step indicator changes after a Template is selected. In this example, the complete Bulletin contains:
- Basic Information
- Forecast
- Hazards
- Crops
- Pest & diseases
- Recommendation
- Contact info
- Key messages
- Export Bulletin
Click Next.
4. Complete Basic Information
Basic Information contains the Bulletin metadata and any Template fields configured for the global header or footer.
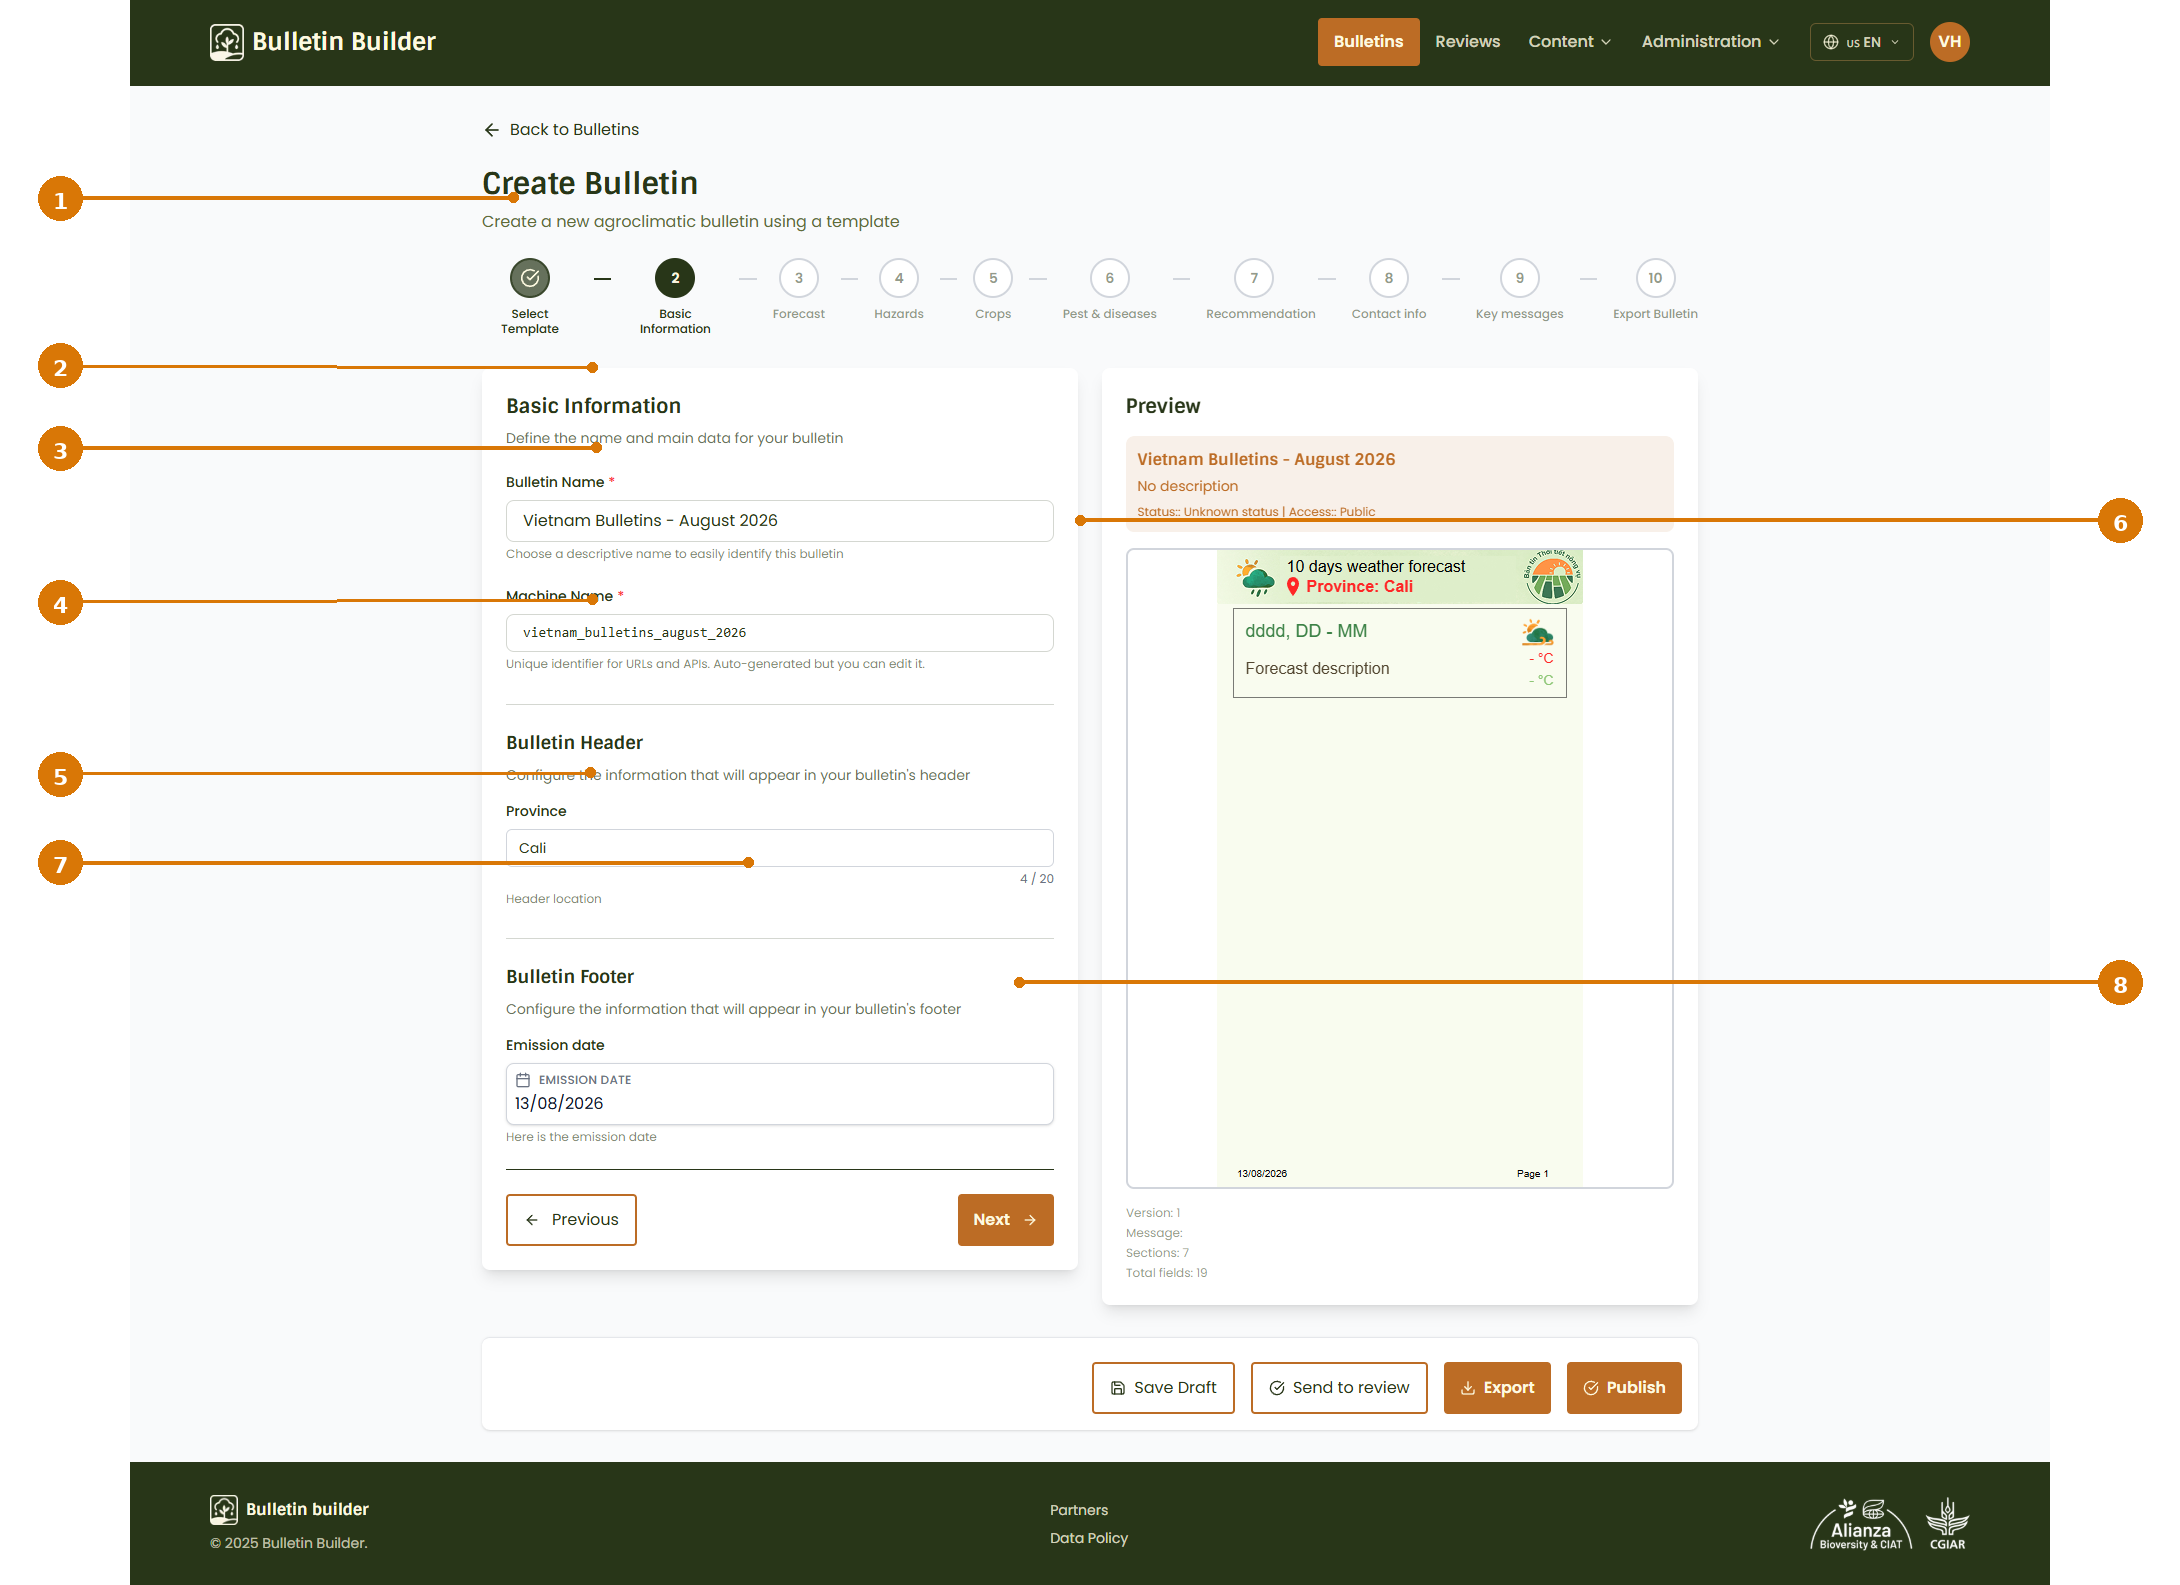
- Basic Information step — The second step of the wizard is active.
- Bulletin Name — Required text field. Enter a descriptive name that helps users identify the Bulletin. In the example:
Vietnam Bulletins - August 2026. - Machine Name — Required text field. This is the internal identifier used for URLs and APIs. It is generated automatically from the Bulletin name, but it can be edited.
- Province — Required text field defined by the Template header. Enter the location that should appear in the Bulletin header. In this Template, the field allows up to 20 characters.
- Emission date — Required date field defined by the Template footer. Select the Bulletin emission/publication date.
- Preview — Updates as values are entered so you can verify how the information appears on the page.
- Next — Continues to the first content section.
- Workflow actions — These actions remain available during the editing flow: Save Draft, Send to review, Export, and, for authorized users, Publish.
What the fields do
| Field | Type | Purpose |
|---|---|---|
| Bulletin Name | Text | Human-readable Bulletin title. |
| Machine Name | Text | Internal identifier for routes, URLs, and APIs. |
| Province | Text | Template-defined header value displayed in the Bulletin header. |
| Emission date | Date | Template-defined footer date rendered in the Bulletin. |
Use the preview continuously
The preview is not only for the final step. Check it while entering data so you can identify formatting or content problems early.
Click Next to open Forecast.
5. Complete the Forecast section
The Forecast section in this Template contains a repeatable list. A repeatable list allows multiple records with the same field structure.
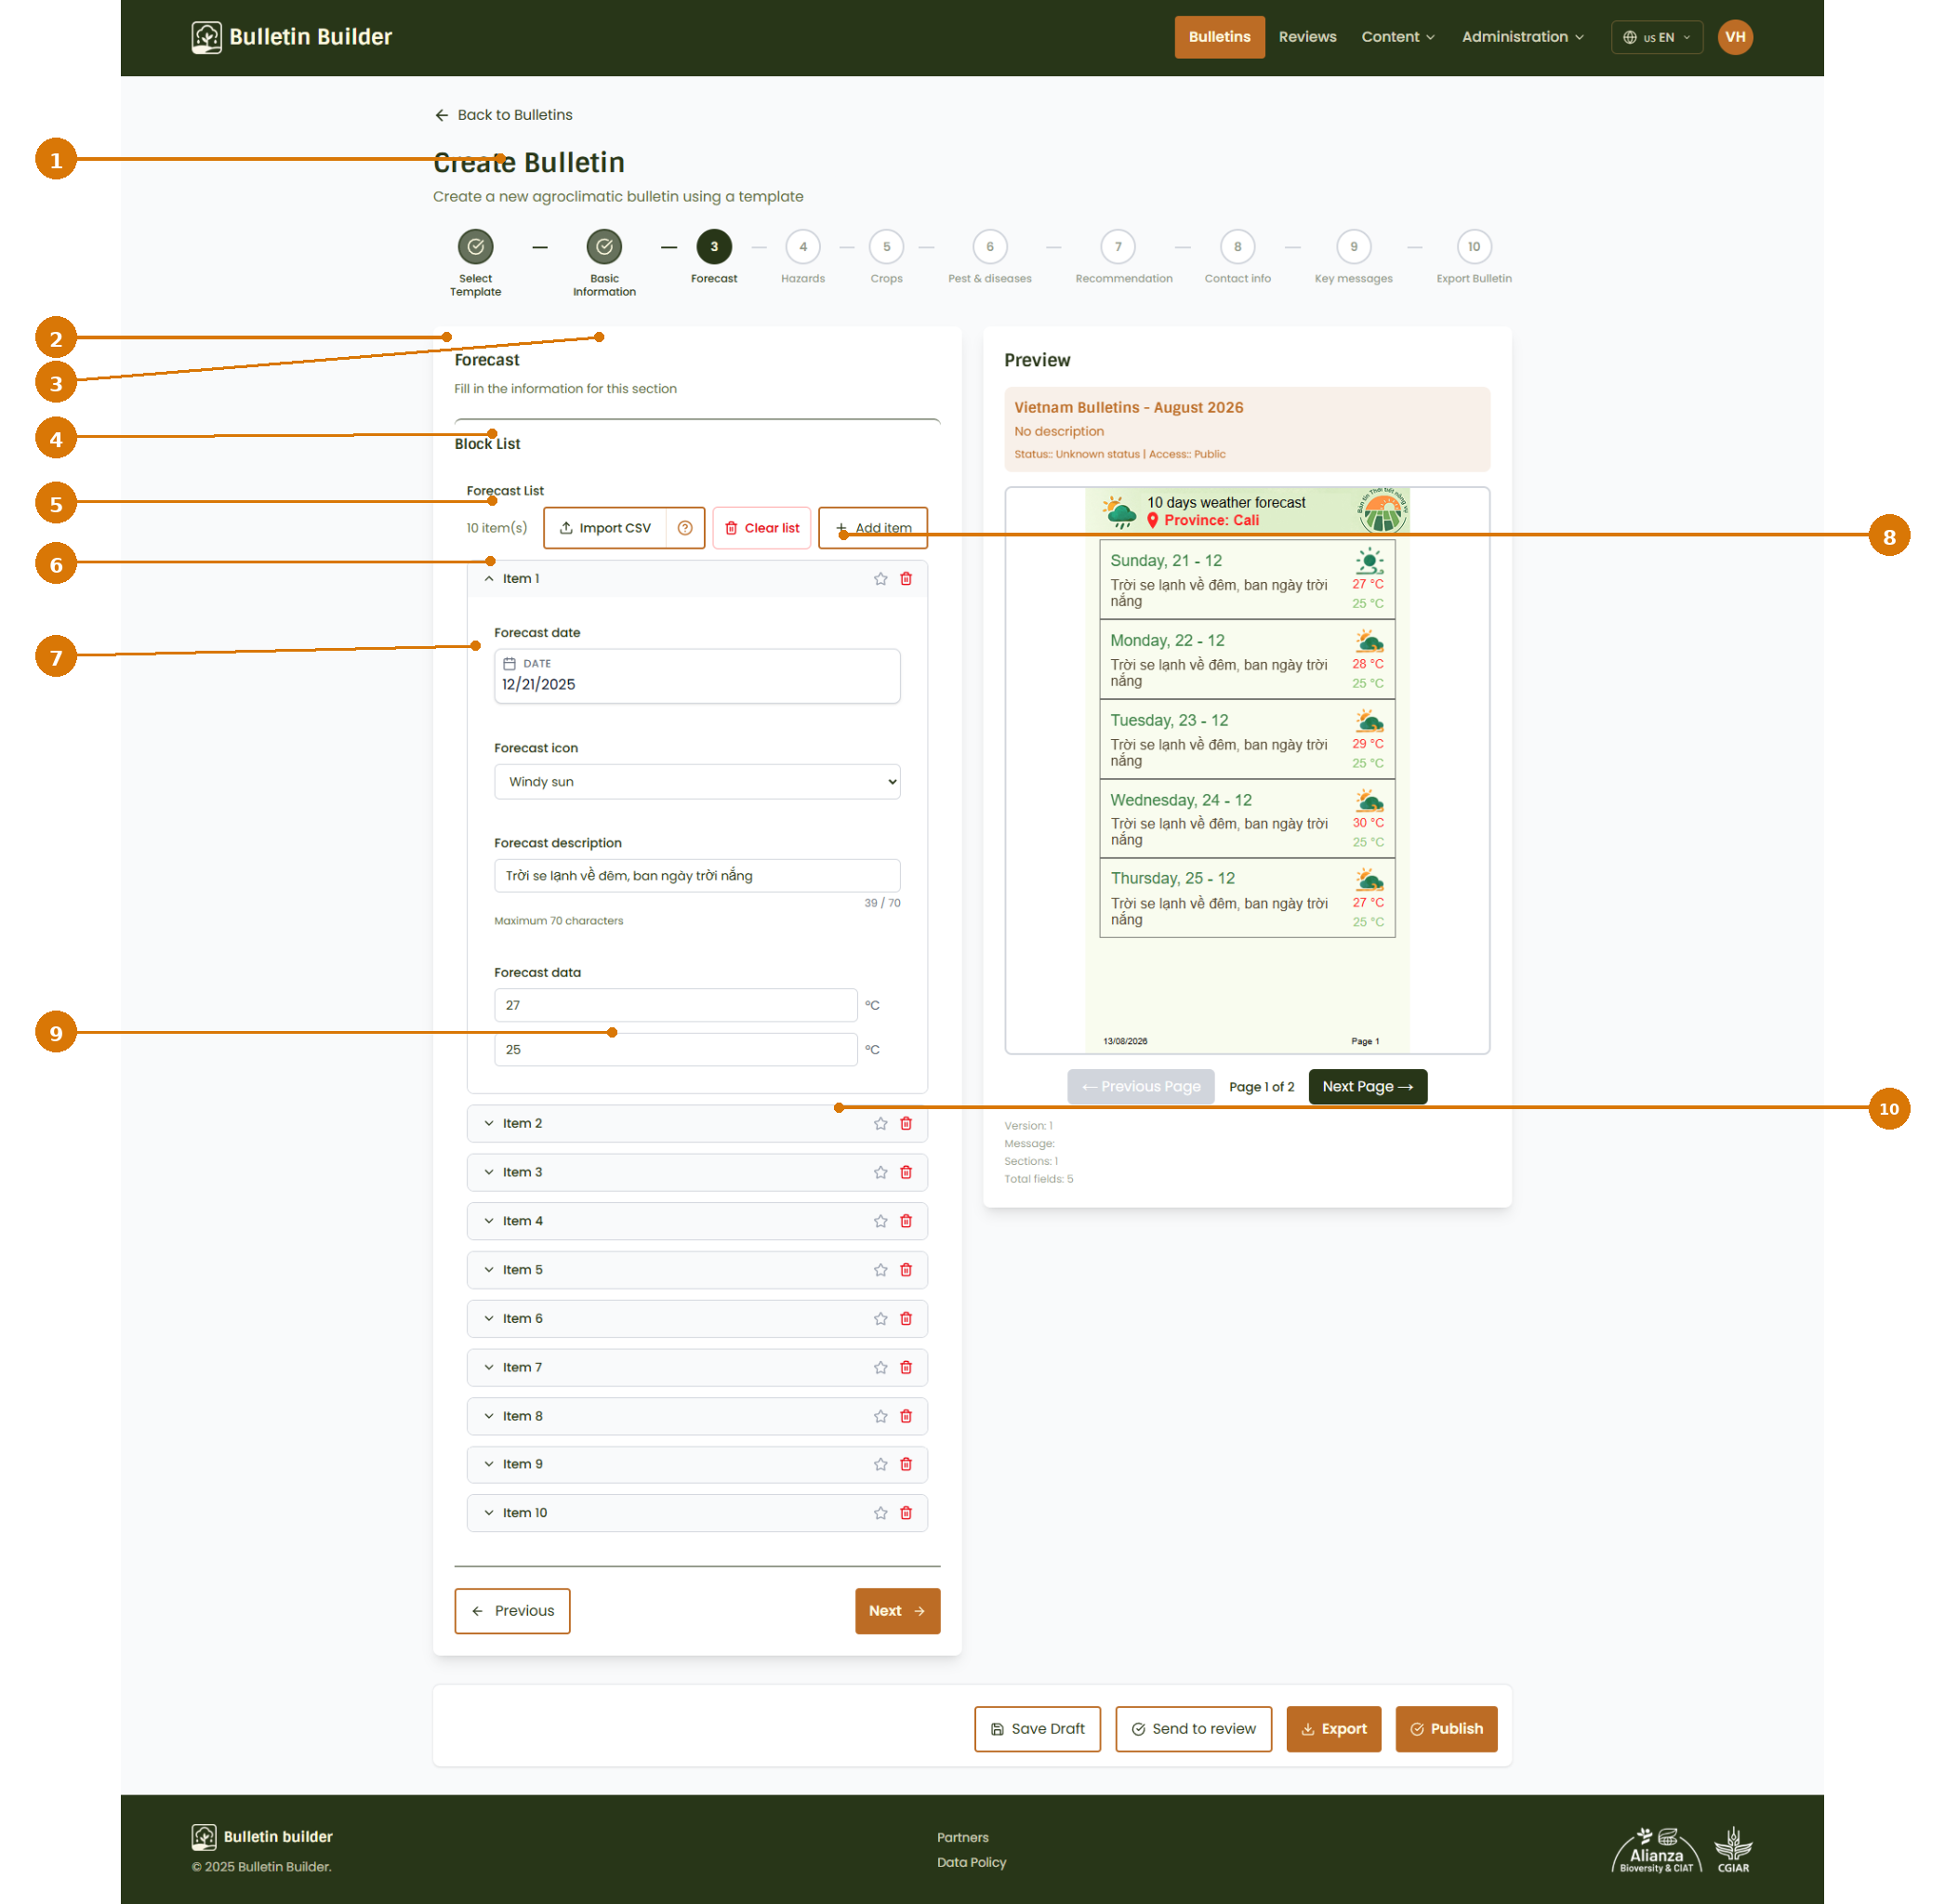
- Forecast step — Shows that Forecast is the active section.
- Import CSV — Populates the repeatable list from a CSV file when you already have the Forecast records prepared in bulk. The CSV must match the fields expected by the section.
- Add item — Adds one Forecast record manually. Clear list removes all current Forecast items.
- Forecast date — Date field. Defines the date represented by the Forecast item.
- Forecast icon — Single-select field. Selects the weather condition/icon that will be rendered for the item, such as
Windy sun. - Forecast description — Text field. Adds the Forecast description. In this Template, the field allows up to 70 characters.
- Forecast data — Numeric fields. Enter the temperature values displayed in degrees Celsius. The Template renders both numeric values for each Forecast item.
- Preview — Shows the generated Forecast page. Use Previous Page and Next Page when the section produces more than one page.
- Next — Continues to Hazards.
- Workflow actions — Save the draft, send it to review, export it, or publish it if your role allows direct publication.
Working with Forecast items
The example contains 10 items, which is the maximum shown by this Template. Each row can be expanded to edit its fields. The trash icon removes an individual item, while Clear list removes the complete list.
When a repeatable section contains more content than fits on one page, the preview automatically creates additional pages. In the example, Forecast is rendered as Page 1 of 2.
Import CSV or manual entry?
Use Import CSV when many items are already available in a structured file. Use Add item when you only need to enter or correct a small number of records manually.
After completing the Forecast data, click Next.
6. Complete the Hazards section
The Hazards section combines a date range with two repeatable lists: a Hazard list and a Hydrological information list.
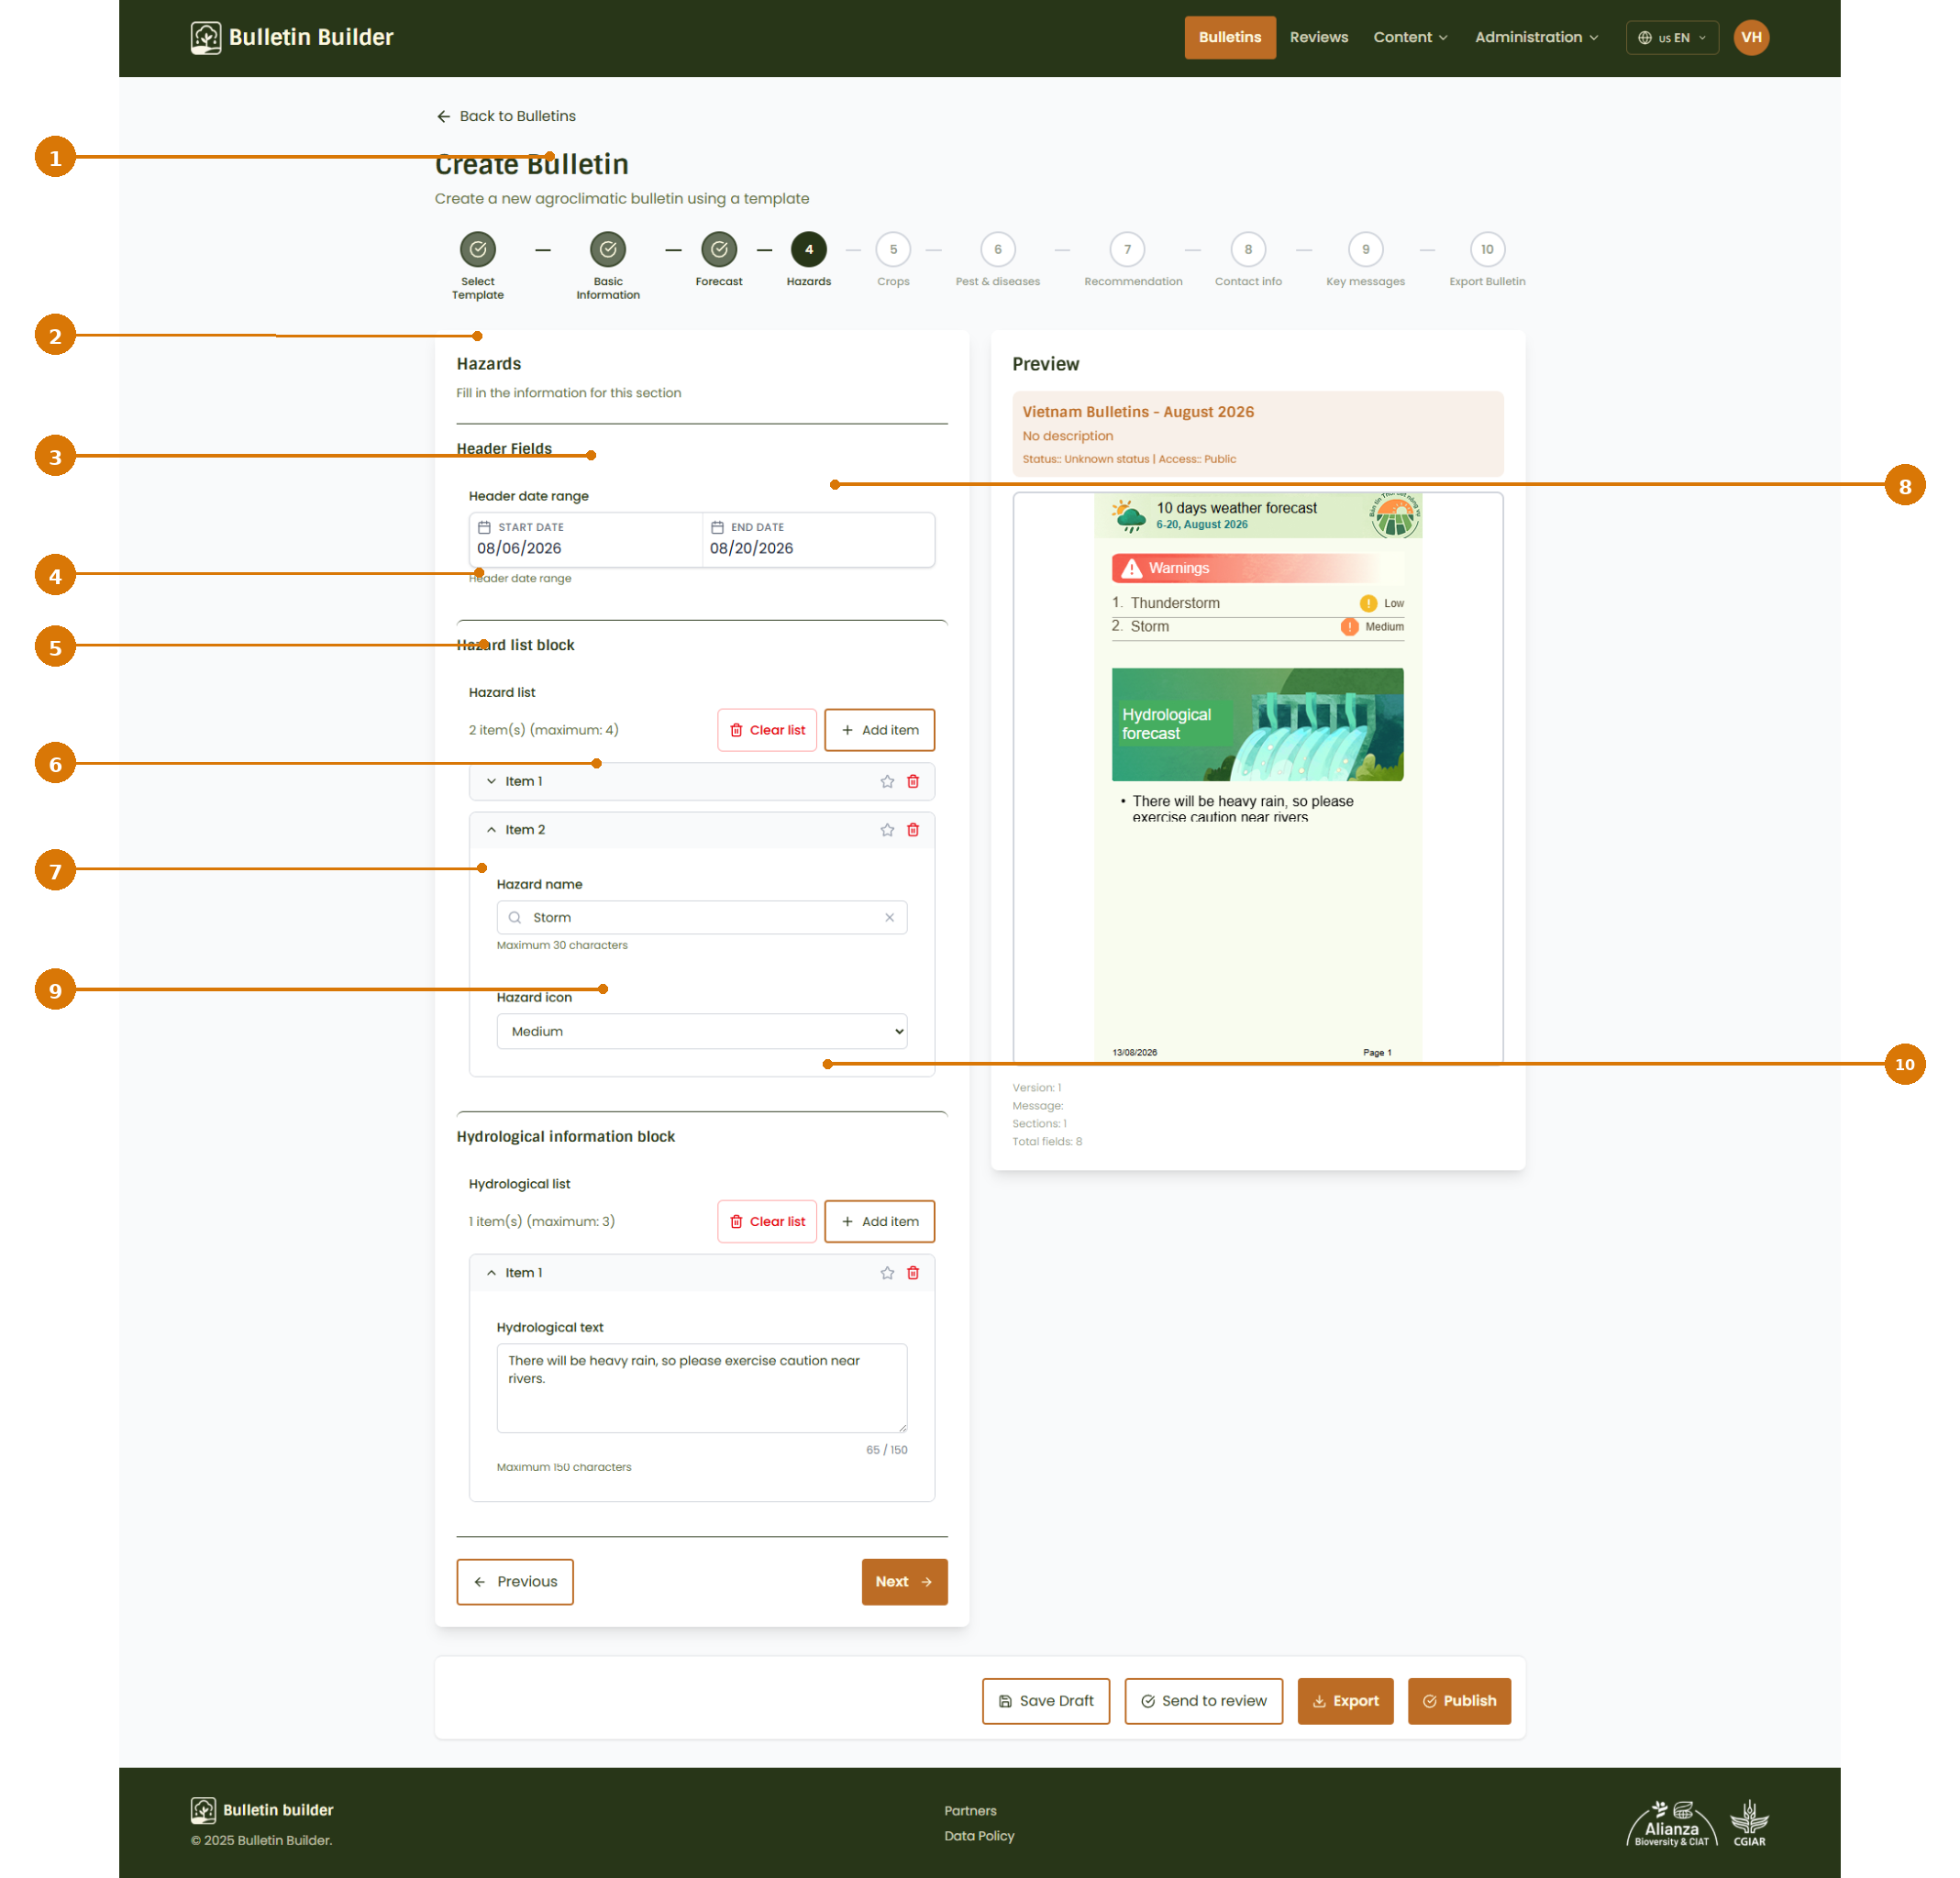
- Hazards step — Shows that Hazards is the active section.
- Header date range — Two date fields: Start Date and End Date. These dates define the period displayed in the Hazards section header.
- Add item — Hazard list — Adds another Hazard record. The Template shows a maximum of 4 items. Clear list removes all Hazard records.
- Hazard name — Searchable/selectable text field. Enter or choose the Hazard name. In this Template, the value is limited to 30 characters.
- Hazard icon — Single-select field. Selects the icon/severity presentation used for the Hazard. In the example,
Mediumis selected. - Add item — Hydrological list — Adds another Hydrological information item. The Template shows a maximum of 3 items.
- Hydrological text — Multiline text field. Enter the Hydrological advisory or description. In this Template, the field allows up to 150 characters.
- Preview — Displays the Hazards and Hydrological information exactly as they will appear in the Bulletin.
- Next — Continues to the following Template section.
- Workflow actions — Save the current state, submit it for review, export it, or publish if authorized.
Example data shown in the interface
The screenshot contains two Hazards, Thunderstorm and Storm, plus a Hydrological advisory. The preview immediately reflects the selected severity/icon and the advisory text.
7. Continue to the final Export Bulletin step
For this walkthrough, the remaining Template sections are skipped so we can focus on the final output workflow. In a real Bulletin, complete each required section before exporting, submitting, or publishing.
At the last step, the application displays every generated page.
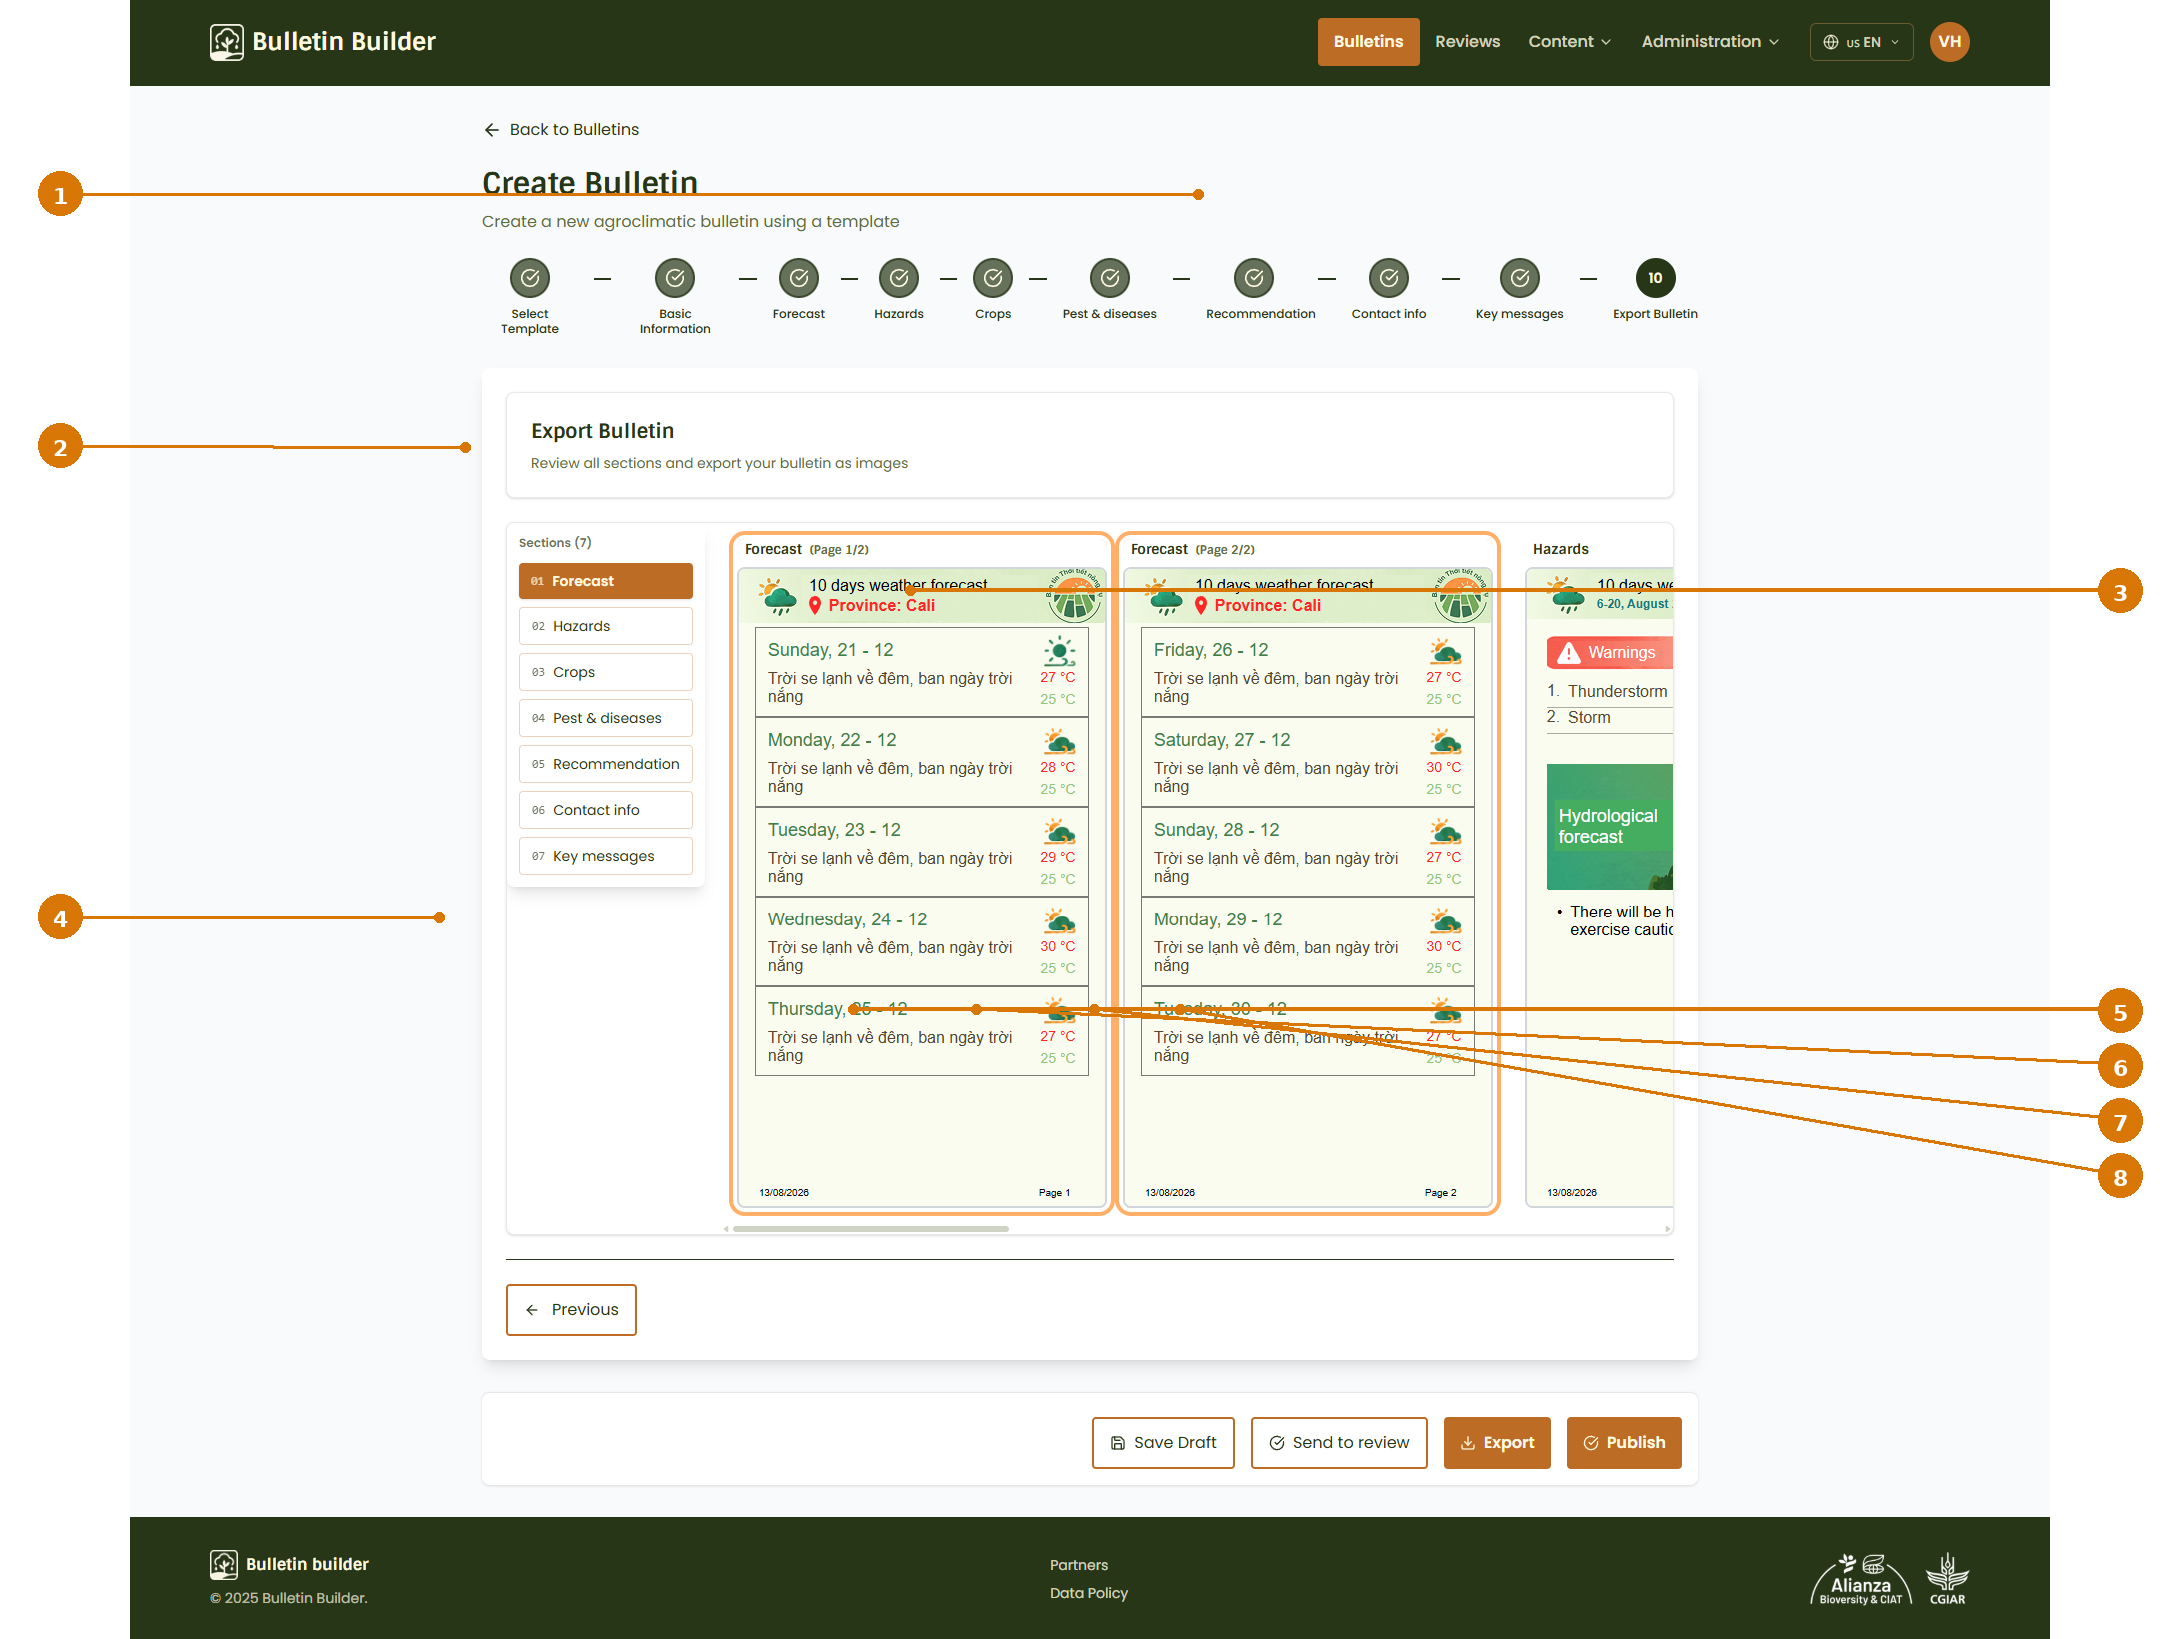
- Export Bulletin step — The final wizard step is active.
- Sections list — Shows every Bulletin section. Select a section to review its generated pages.
- Page preview — Displays the pages that will be included in the output. A section can produce multiple pages; the example shows Forecast Page 1/2 and Page 2/2.
- Previous — Returns to the previous content section.
- Save Draft — Saves the Bulletin without changing it to a review or published state.
- Send to review — Sends the Bulletin to the Reviews workflow. Use this when another user must review the Bulletin or when you cannot publish directly.
- Export — Opens the export configuration dialog.
- Publish — Starts direct publication. This action is only available for users with the supereditor role.
8. Export the Bulletin
Click Export to choose how the generated pages should be exported.
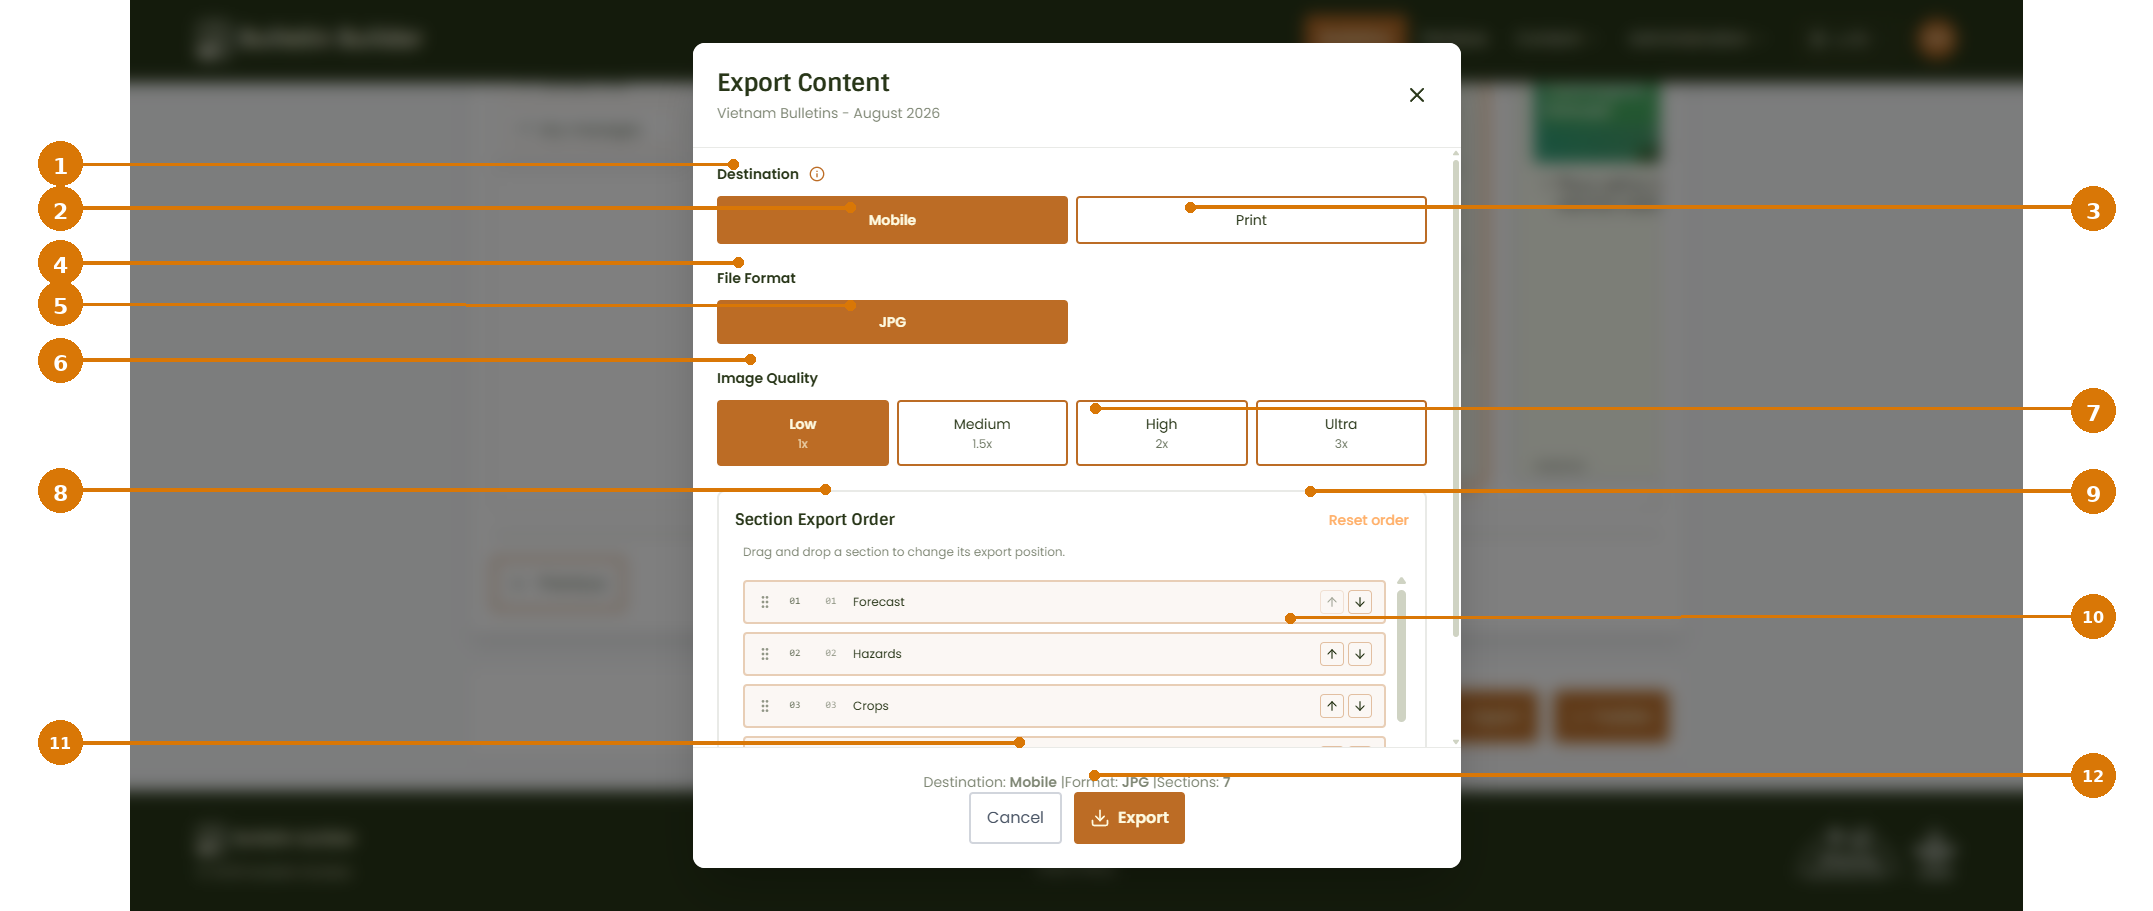
- Destination — Selects the intended output destination.
- Mobile — Optimizes the export for digital/mobile use. This is selected in the example.
- Print — Uses the print-oriented output configuration. Use this option when the exported pages are intended for printing and when you want the Template's print visibility settings to be applied.
- File Format — Selects the output image format.
- JPG — The format shown in the current interface.
- Image Quality — Controls the resolution scale of the exported images.
- Quality options — Choose Low (1x), Medium (1.5x), High (2x), or Ultra (3x).
- Section Export Order — Controls the order in which Bulletin sections are exported.
- Reset order — Restores the default section order.
- Reorder controls — Drag a section or use the up/down arrows to change its position.
- Export summary — Confirms the selected Destination, Format, and number of Sections before exporting.
- Export — Generates the export using the selected options.
Choosing an image quality
| Quality | Scale | When to use it |
|---|---|---|
| Low | 1x | Quick previews, messaging, or smaller files. |
| Medium | 1.5x | General digital sharing with more detail. |
| High | 2x | Higher-resolution digital output or documents where text clarity is important. |
| Ultra | 3x | Maximum detail when larger files and longer generation time are acceptable. |
Mobile vs. Print
Mobile is appropriate when the Bulletin will mainly be viewed on screens. Print is the better choice when the final output is intended for printing and should follow the Template's print-specific visibility rules.
Click Export after confirming the options, or Cancel to return without exporting.
9. Publish directly — supereditor only
If you have the supereditor role and the Bulletin is ready to go live, click Publish from the workflow action bar.
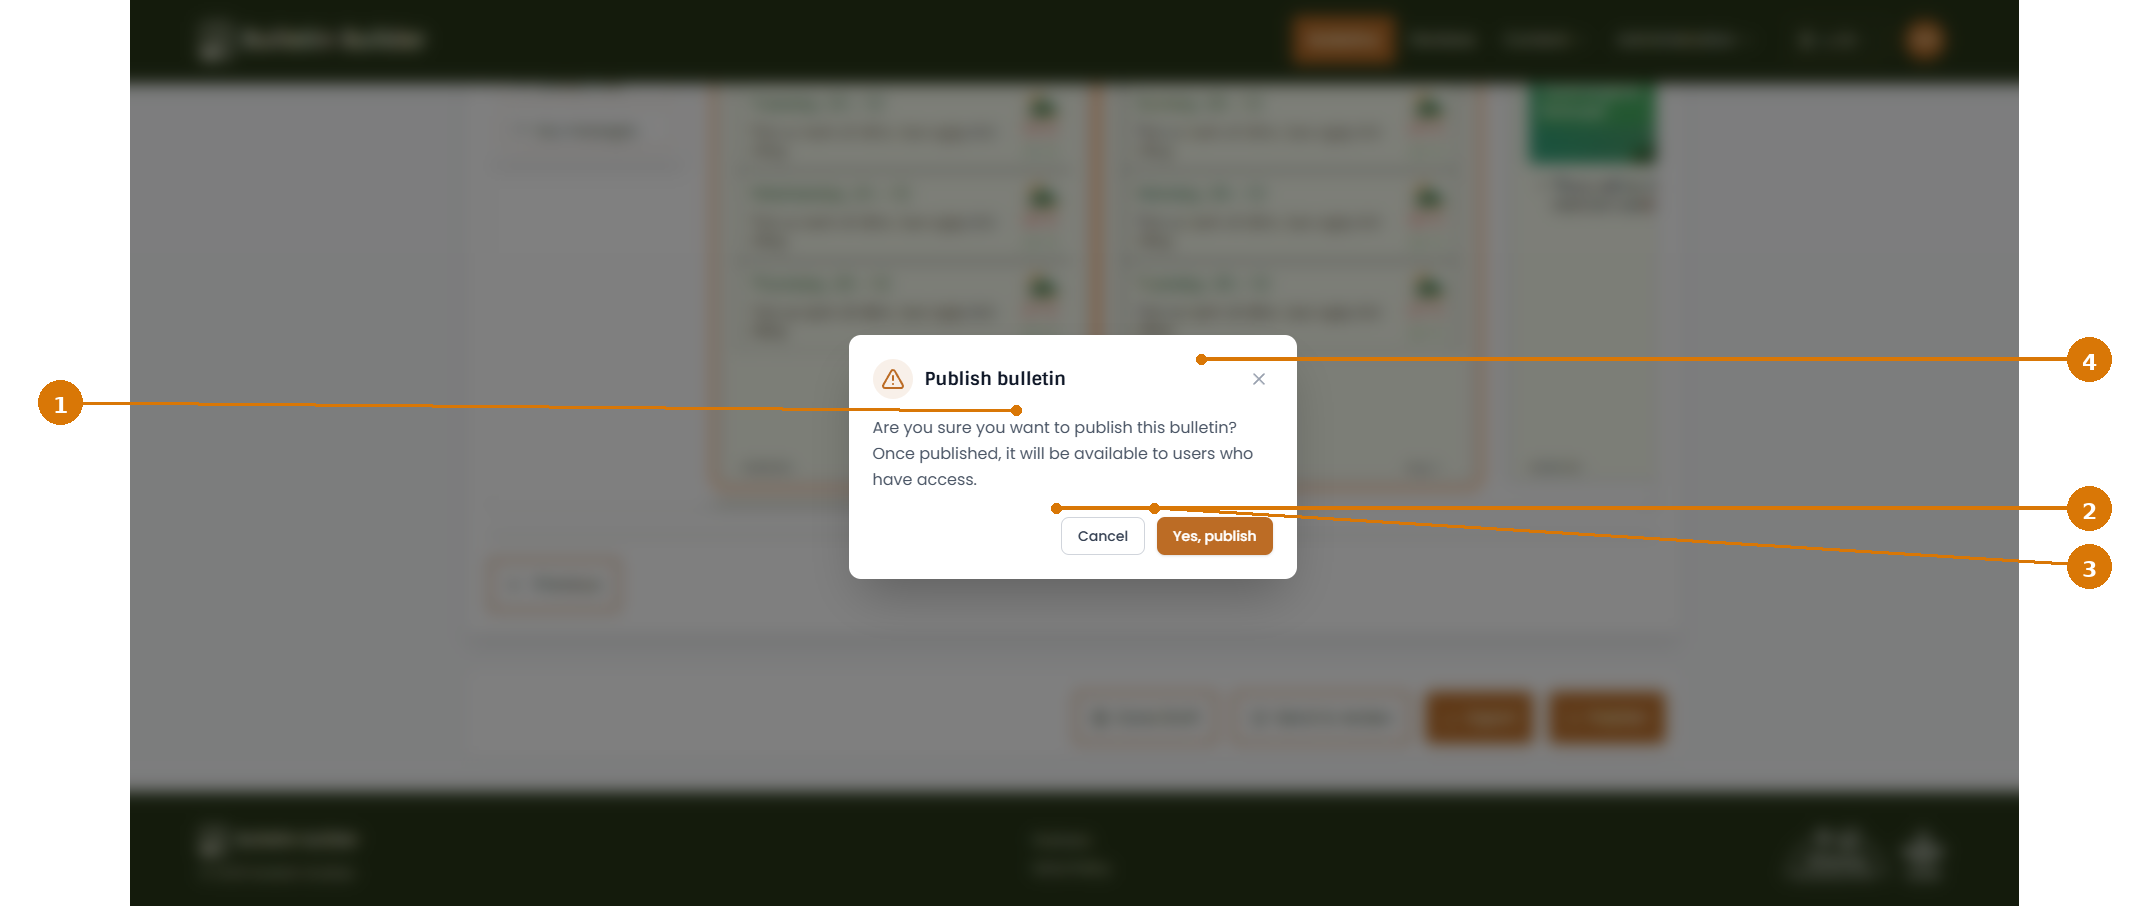
- Confirmation message — Explains that the Bulletin will become available to users who have access.
- Cancel — Stops the publication process.
- Yes, publish — Confirms publication.
- Close — Closes the confirmation dialog.
Publication is a final workflow action
Review the generated pages before confirming. If your role does not allow direct publication, use Send to review instead.
Click Yes, publish to continue.
10. Copy or open the published Bulletin
After successful publication, the system displays the Bulletin URL.
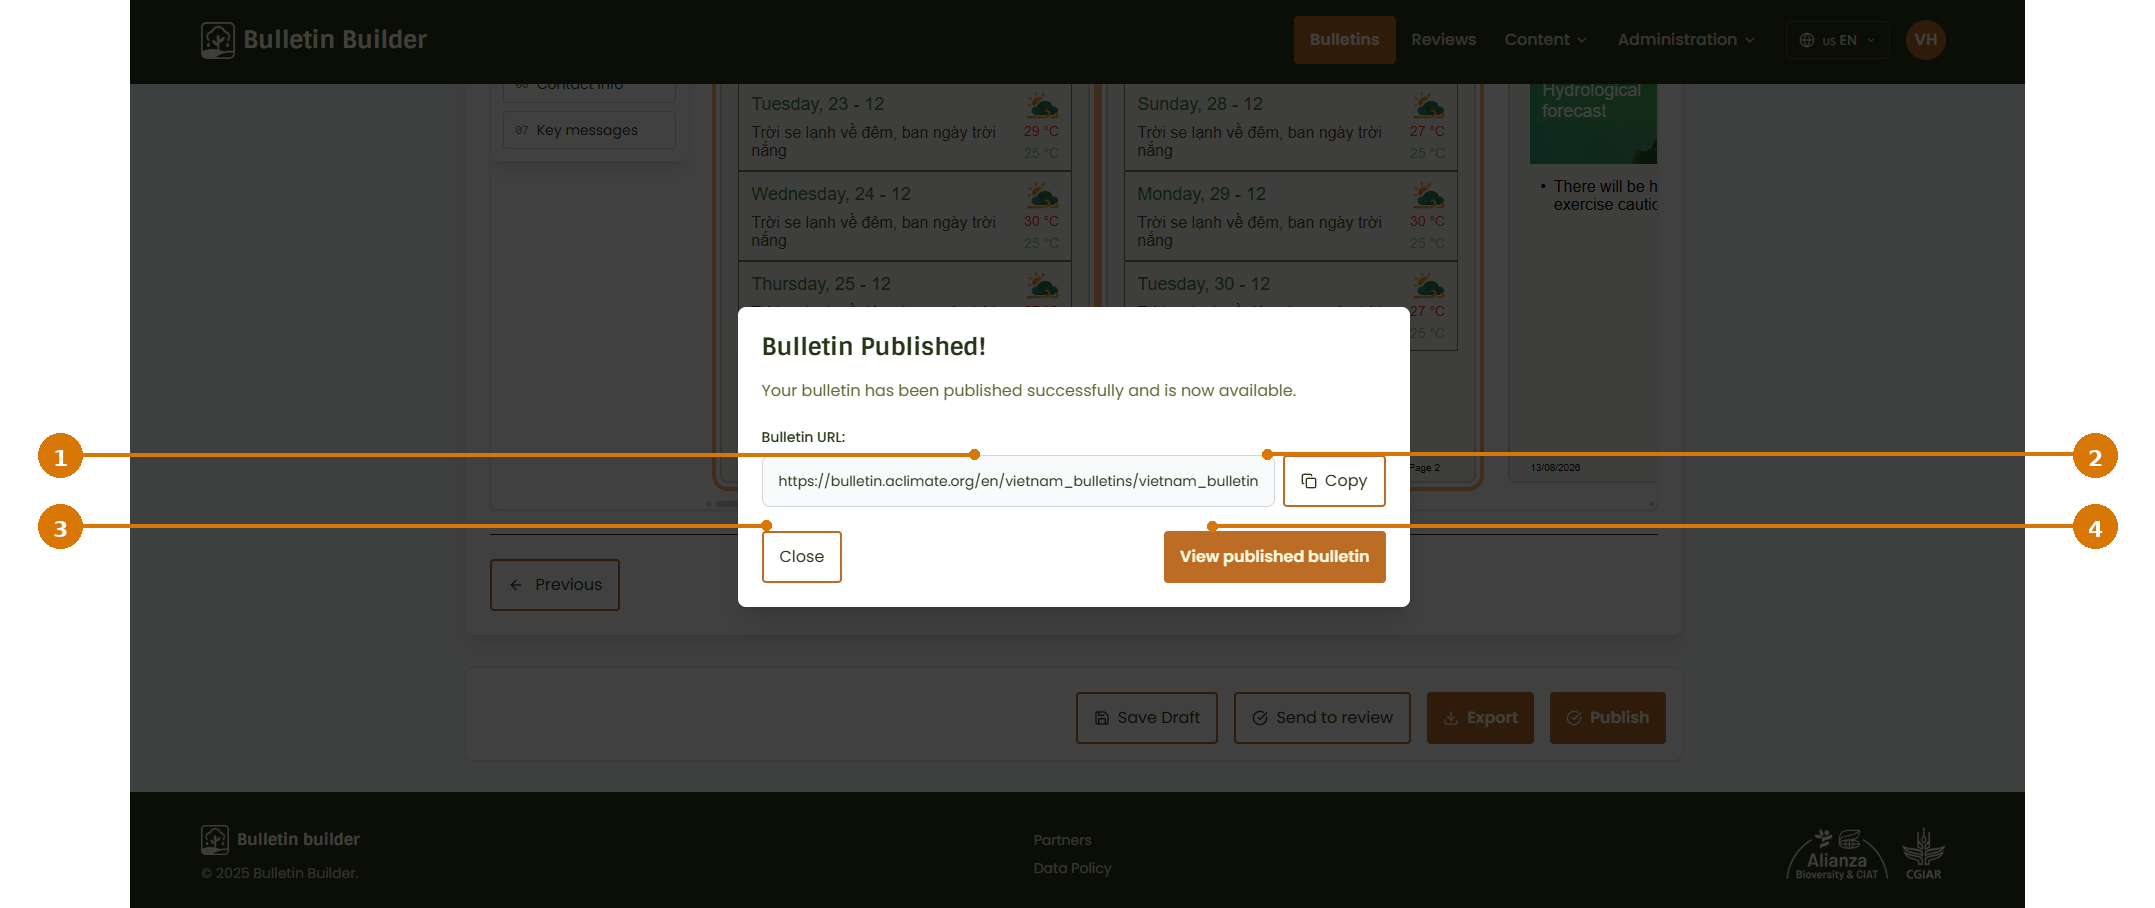
- Bulletin URL — Public/published URL generated for the Bulletin.
- Copy — Copies the URL so it can be shared.
- Close — Closes the success dialog.
- View published bulletin — Opens the published Bulletin immediately.
The published URL should be shared only with the audience intended by the Bulletin's access configuration.
11. View the published Bulletin
The published Bulletin view displays the final rendered pages and allows the section order to be reviewed again for export.
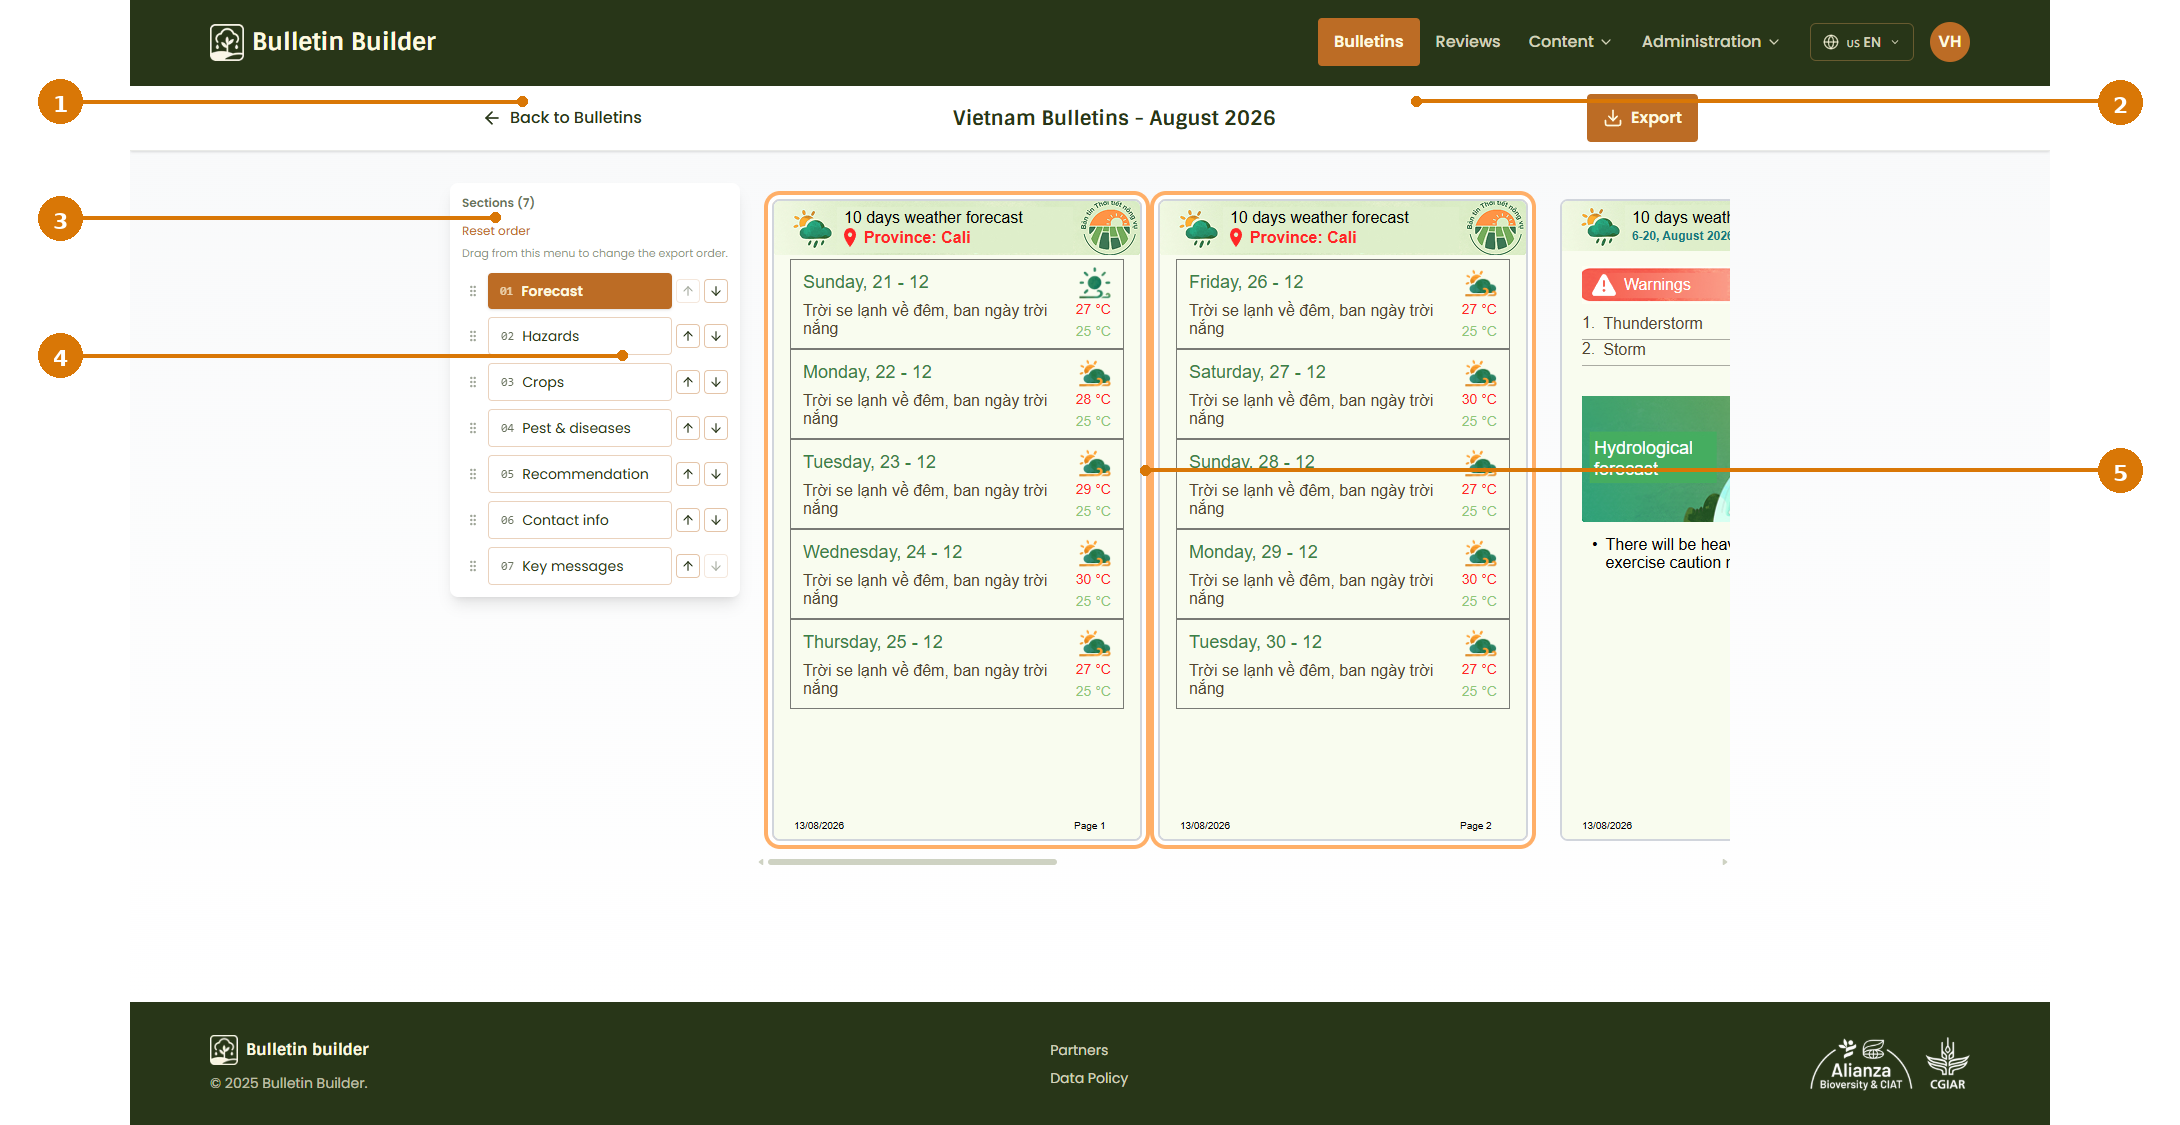
- Back to Bulletins — Returns to the Bulletin management page.
- Export — Opens the export options for the published Bulletin.
- Sections panel — Shows the Bulletin sections in the current export order.
- Reorder controls — Move sections up or down before exporting.
- Published page preview — Displays the final rendered Bulletin pages.
For a detailed description of all Bulletin actions and statuses, see Bulletins. For the approval workflow, see Reviews.