Reviews
The Reviews module is used to review Bulletins before publication. Reviewers can inspect the rendered bulletin, add general or element-specific comments, reply to existing comments, reject a bulletin for corrections, or approve and publish it.
Open Reviews from the main navigation bar.
1. Reviews list
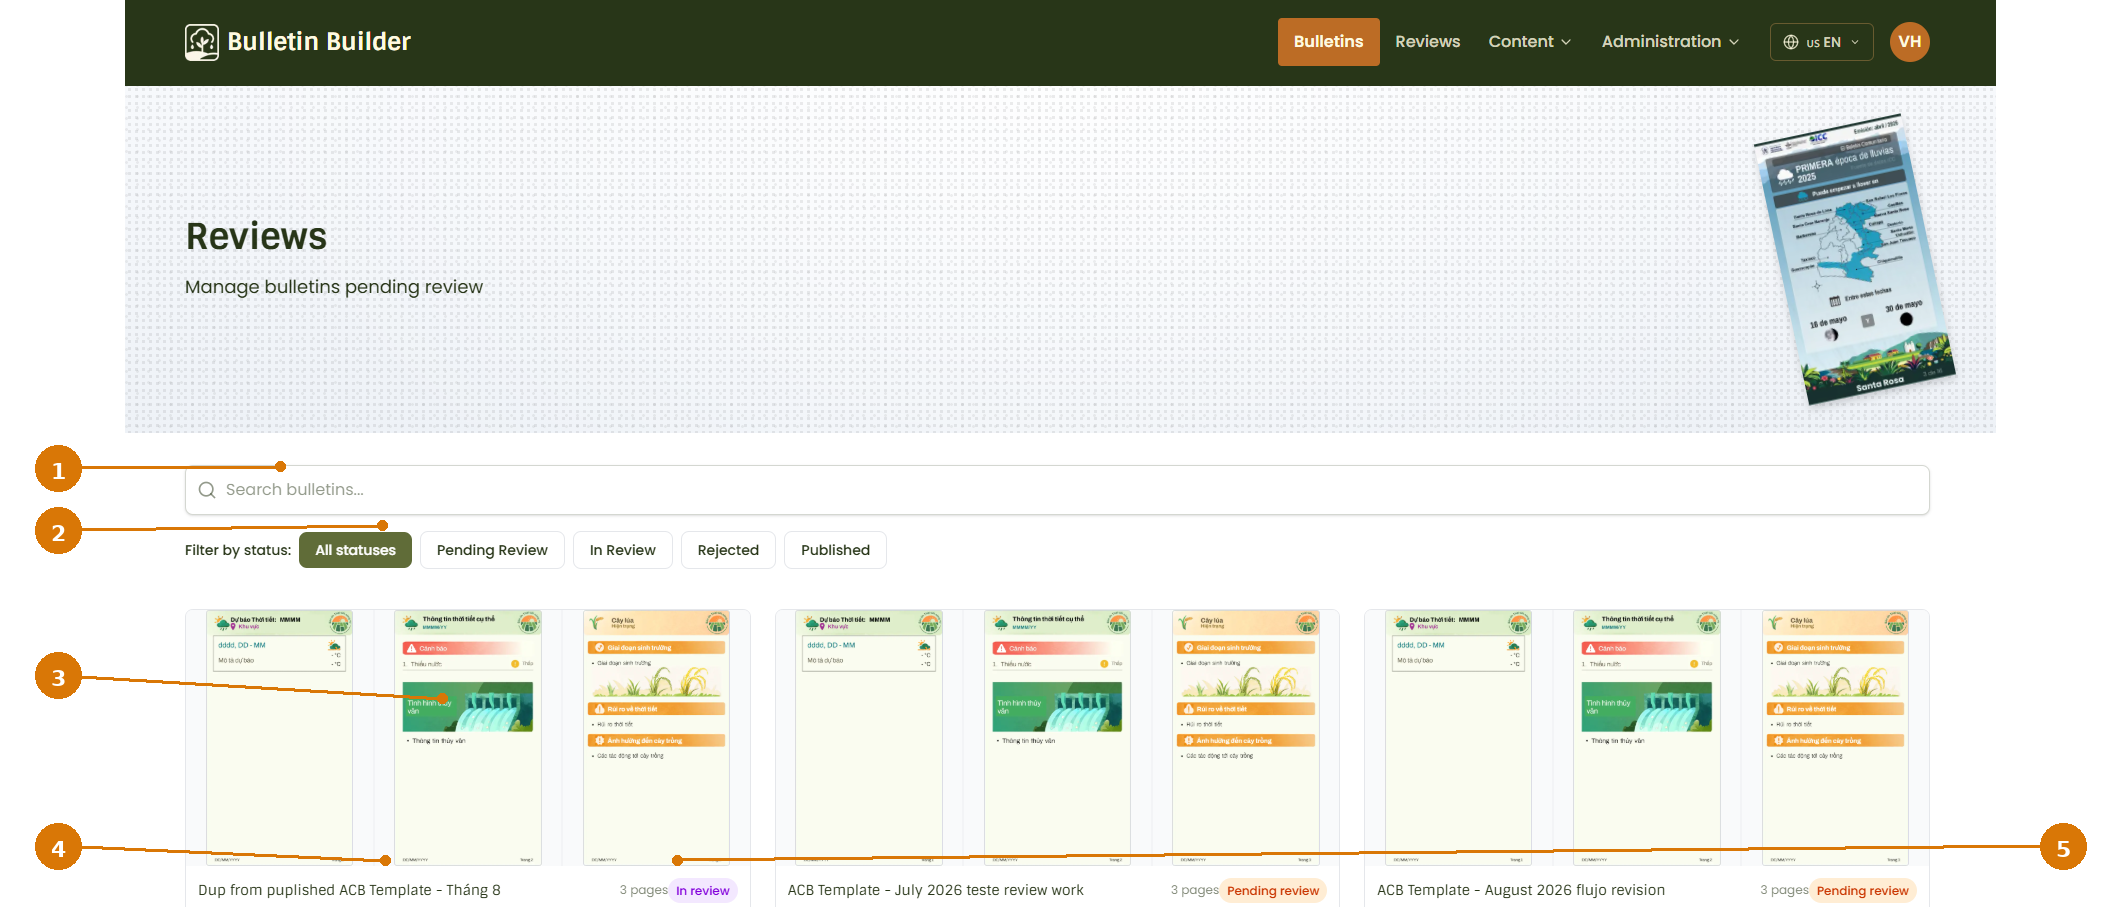
- Search bulletins — Filters the review list by bulletin name.
- Status filters — Filters the review queue by Pending Review, In Review, Rejected, or Published.
- Bulletin card / preview — Shows a visual preview of the bulletin pages available for review.
- Bulletin name — Identifies the bulletin in the review queue.
- Review status — Shows the current workflow state of the bulletin, such as In review or Pending review.
Use All statuses to display every bulletin available in the Reviews module.
Review statuses
- Pending Review — The bulletin has been submitted for review.
- In Review — The bulletin is currently being reviewed.
- Rejected — The bulletin was returned for corrections.
- Published — The bulletin was approved and published.
For the complete Bulletin workflow, see Bulletins.
2. Open the review workspace
Open a bulletin from the Reviews list to inspect its content and comments.
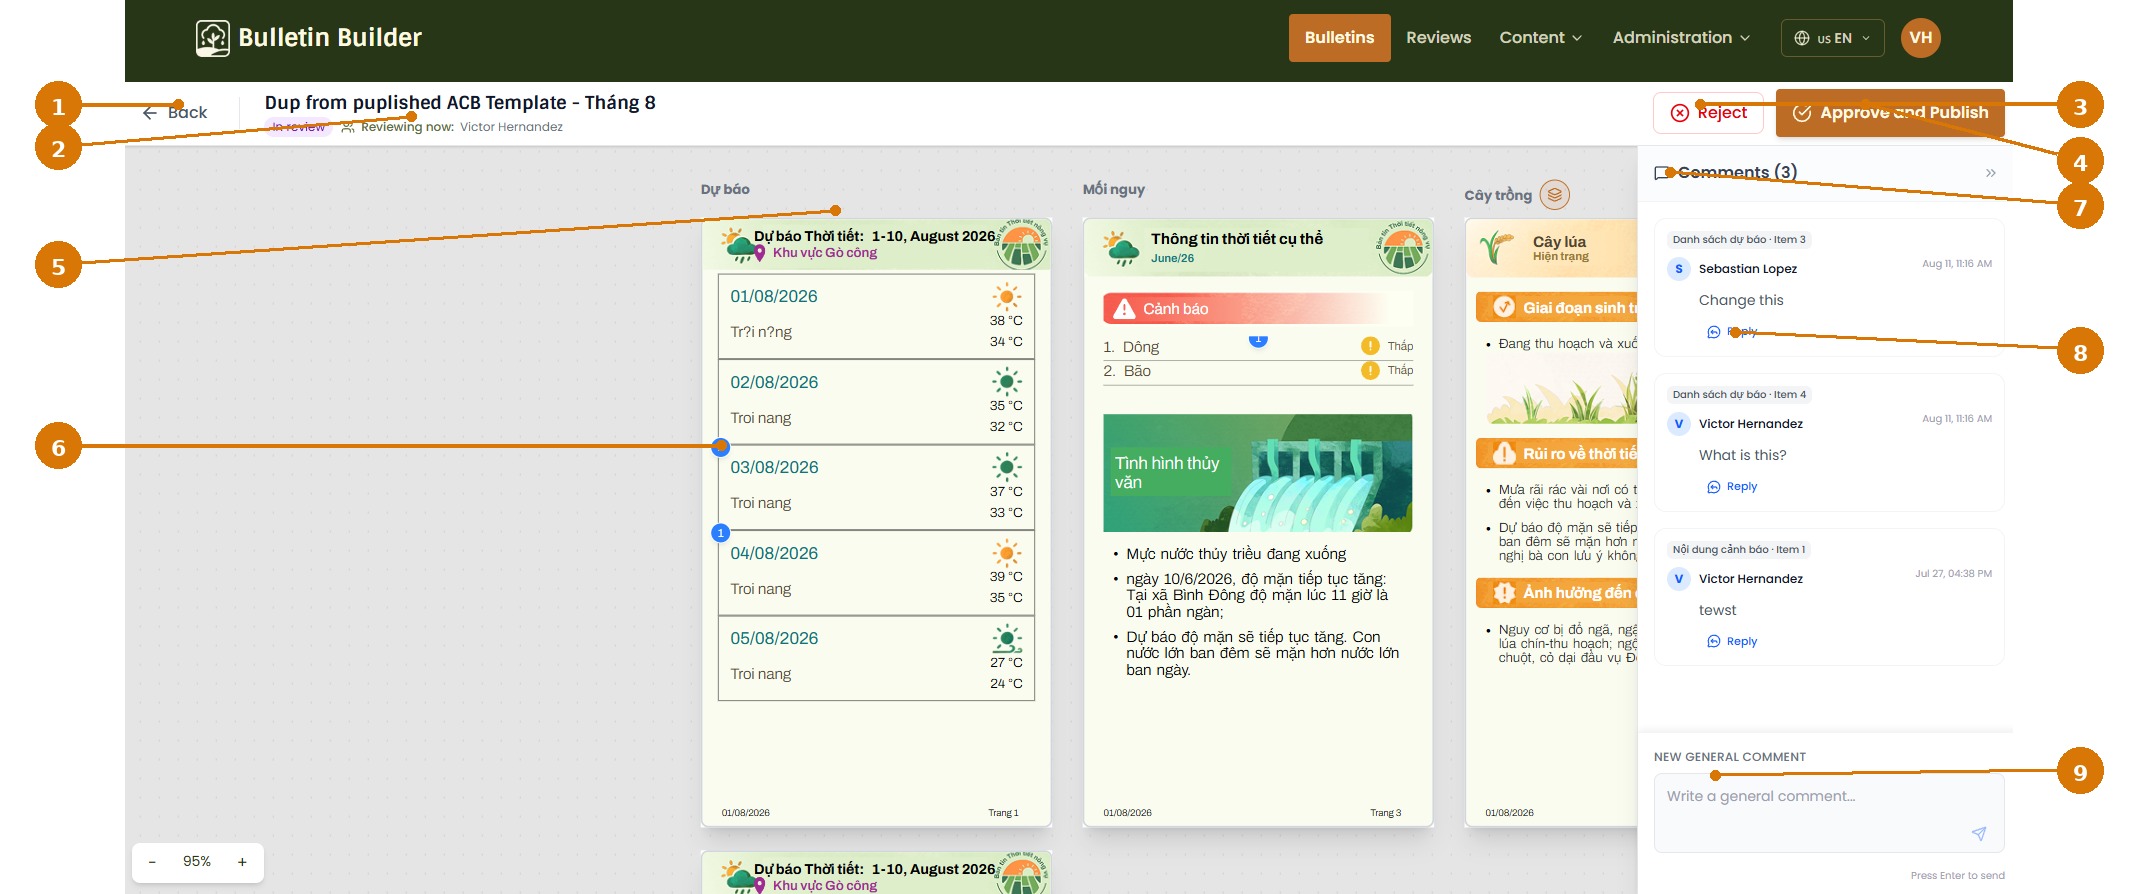
- Back — Returns to the Reviews list.
- Review information — Shows the bulletin name, current review status, and the user currently reviewing it.
- Reject — Starts the rejection workflow.
- Approve and Publish — Approves the bulletin and publishes it.
- Bulletin preview — Displays the bulletin pages exactly as they are currently configured.
- Element comment marker — Blue numbered markers identify elements that have review feedback attached to them.
- Comments panel — Shows the comments associated with the current review.
- Reply — Adds a response to an existing comment.
- New General Comment — Adds feedback that applies to the bulletin as a whole instead of one specific element.
The review workspace allows reviewers to inspect the actual rendered pages while keeping comments visible in the panel on the right.
3. Review existing comments
Each comment card can show:
- the bulletin element associated with the comment, when applicable
- the comment author
- the date and time
- the comment text
- a Reply action.
When an element has review feedback, a blue numbered marker appears next to that part of the bulletin.
Clicking or selecting the relevant element allows the reviewer to work with feedback attached to that specific content.
4. Add a comment to a specific element
A reviewer can also attach feedback directly to an individual bulletin element.
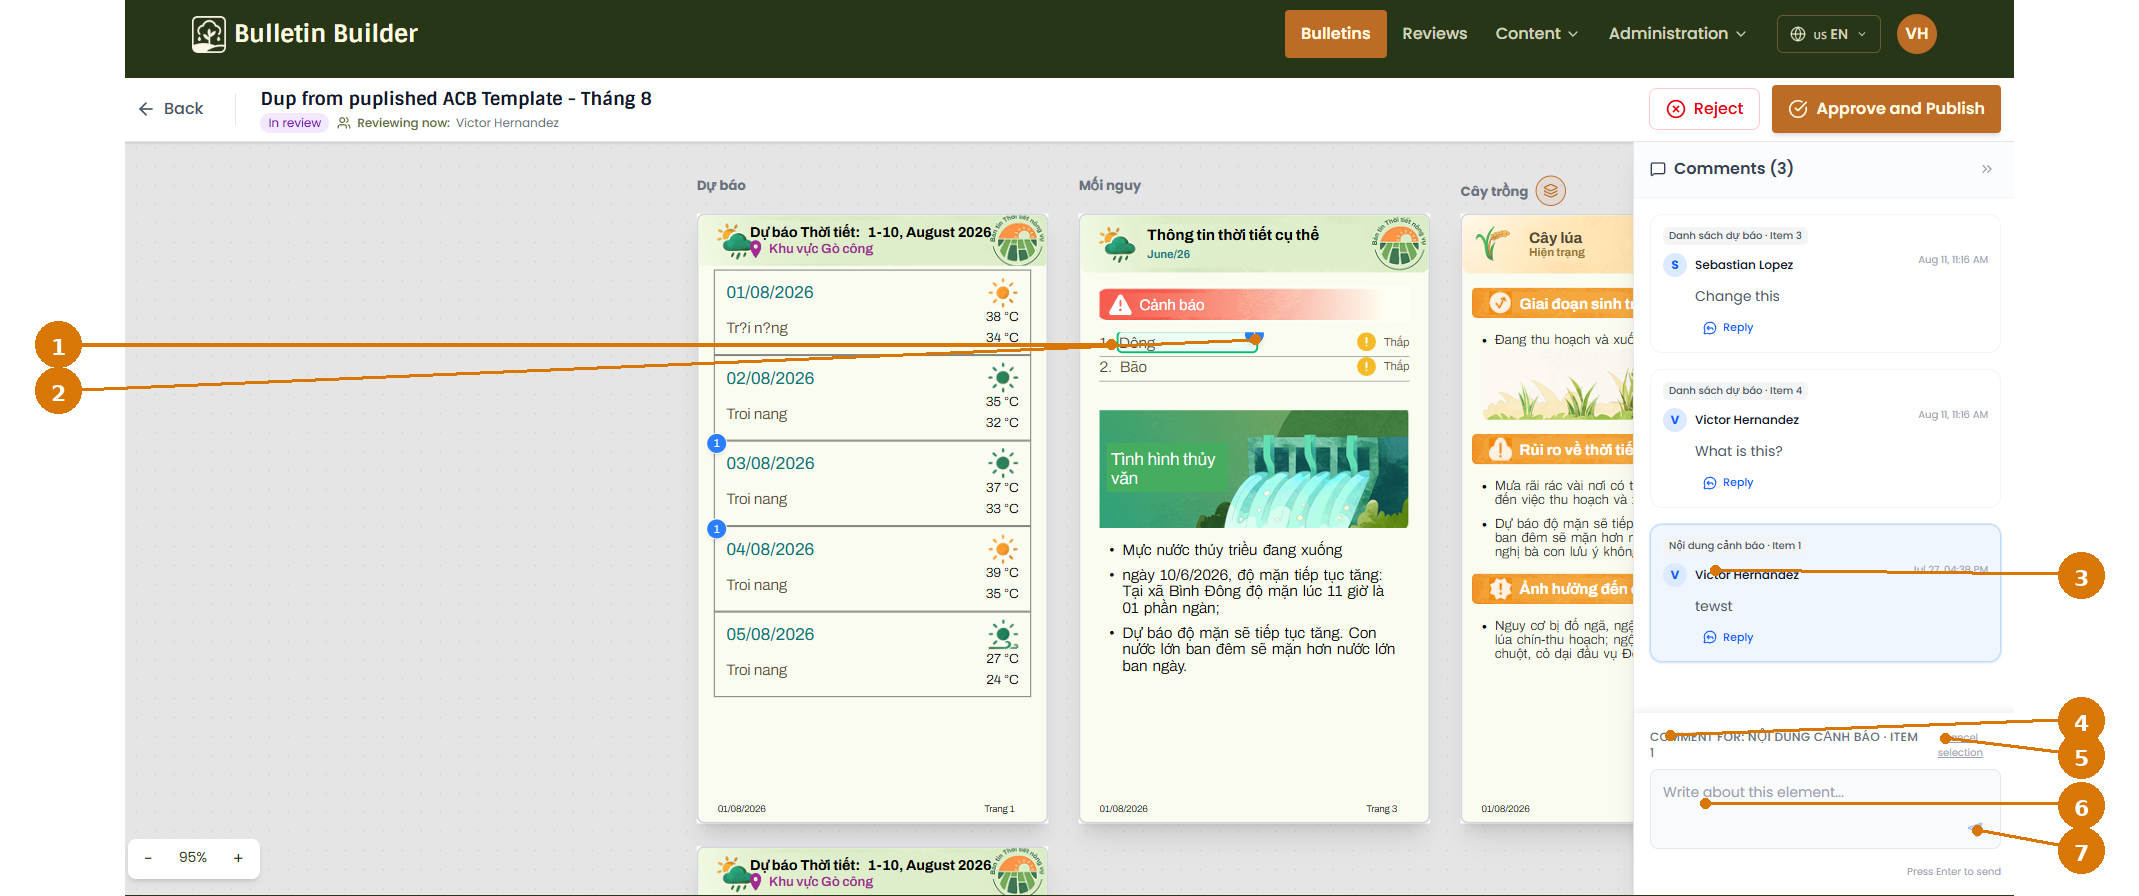
- Selected element — The highlighted element indicates the exact content currently selected for feedback.
- Comment marker — Identifies content that already has attached review feedback.
- Selected comment — The highlighted comment card corresponds to the selected review target.
- Comment target — Shows the element and item that the new comment will be attached to.
- Cancel selection — Stops the element-specific commenting mode.
- Element comment box — Enter feedback about the selected element.
- Send — Submits the element-specific comment.
Add element-specific feedback
- Select the element you want to comment on in the bulletin preview.
- Confirm the target shown under COMMENT FOR.
- Enter the feedback in the comment box.
- Send the comment.
Use element comments for precise feedback
Element-specific comments are useful when the requested change applies to one field, list item, warning, recommendation, or other individual content element.
5. Reply to a comment
Use Reply below an existing comment when your message is a response to that specific review thread.
This keeps the discussion associated with the original feedback instead of creating a separate general comment.
6. Reject a Bulletin
Click Reject when the bulletin must be returned for corrections.
If another reviewer is currently active, the application displays an additional warning before the rejection is confirmed.
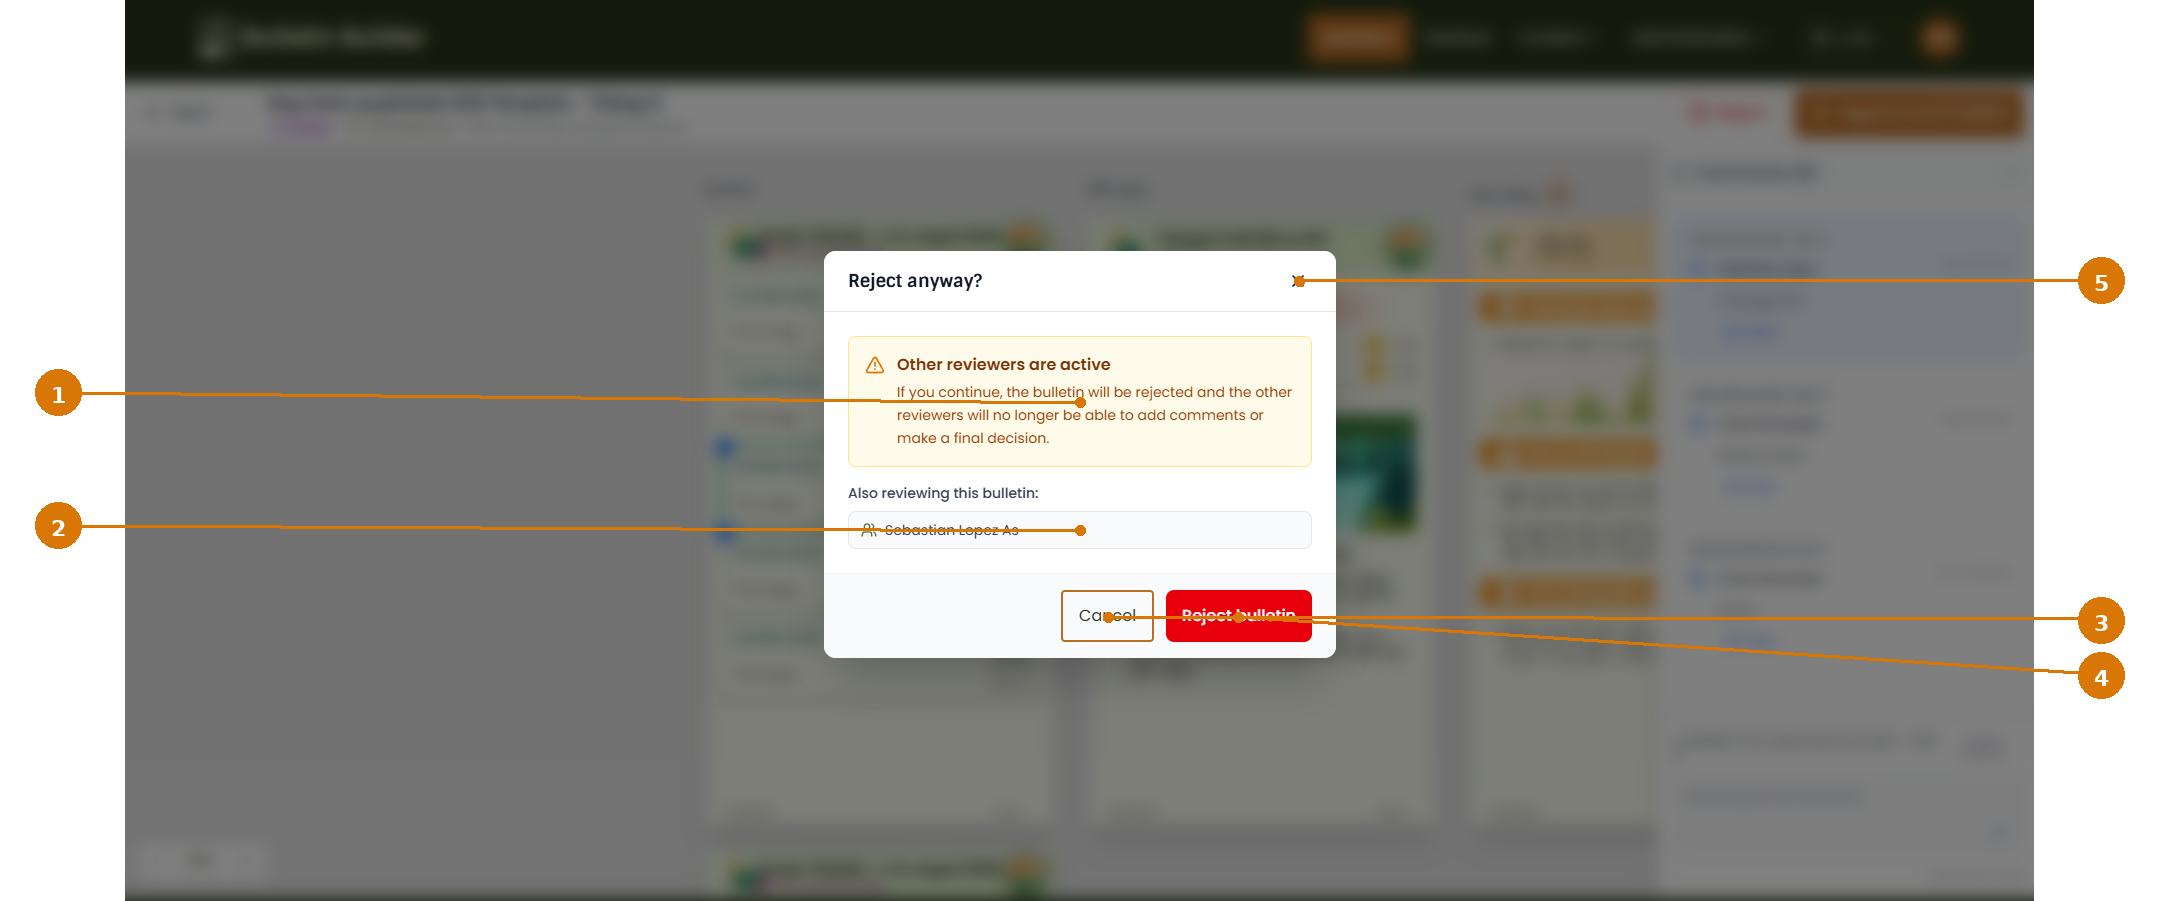
- Active-reviewer warning — Explains the effect of rejecting while other reviewers are still active.
- Other active reviewers — Lists the users who are also reviewing the bulletin.
- Cancel — Leaves the bulletin in its current review state.
- Reject bulletin — Confirms the rejection.
- Close — Closes the confirmation dialog.
Rejecting while other reviewers are active
The interface warns that if you continue, the bulletin will be rejected and the other active reviewers will no longer be able to add comments or make a final decision.
After rejection, the bulletin follows the rejected-bulletin workflow described in Bulletins.
7. Approve and Publish
When the bulletin is ready for publication, click Approve and Publish.
Before approving:
- Review all bulletin pages.
- Check the Comments panel for unresolved feedback.
- Verify any fields marked with comment indicators.
- Confirm that no additional corrections are required.
- Click Approve and Publish.
The bulletin then moves into the published stage of the Bulletin workflow.
For information about published Bulletins and public links, see Published bulletin dialog.
8. Review workflow summary
A typical review workflow is:
- Open Reviews.
- Find a Pending Review or In Review bulletin.
- Open the bulletin.
- Inspect every rendered page.
- Review existing comments.
- Add general comments when feedback applies to the whole bulletin.
- Add element-specific comments for precise changes.
- Reply to review threads when needed.
- Choose one final action:
- Reject when changes are required; or
- Approve and Publish when the bulletin is ready.
Final review decisions
Review the bulletin and existing collaboration activity carefully before rejecting or approving it, especially when the interface indicates that other reviewers are active.